

Infants/Childs Mid-19th Century Short Sleeve Gown
This is one of my all time favorite styles to make for my little boys for Civil War reenacting. The style goes together very quickly and it is easy to adjust to their figures and comfortable to wear.
An infants gown takes approximately 1 and ½ to 2 yards of fabric, depending on how long you want to make the skirts (at least below feet level) and a toddlers dress takes 1 yard to 1 ½ yards, depending on how full you wish the skirts to be, if tucked, how many tucks and how wide you want your hem to be.
For washability and wearability, make of a nice cotton fabric. This style is suitable for babies and little boys until they are "breeched" and for little girls until they adopt women's styles of clothing. Given here are sizes newborn -18 months. Bigger sizes to follow as my boys get bigger and I draw out more pattern sizes! :)
To make this dress you will need the following pieces:
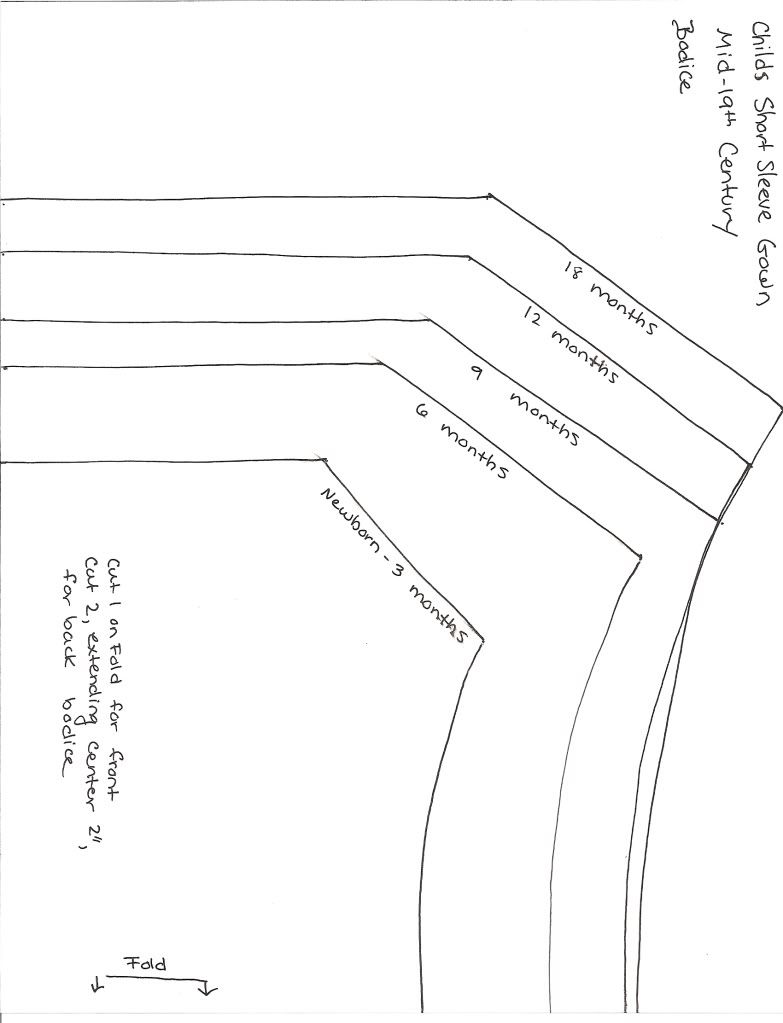
1 Bodice Front, cut on Fold
2 Bodice Backs, cut with the center line extended 2” (this was the fold line for Bodice Front)
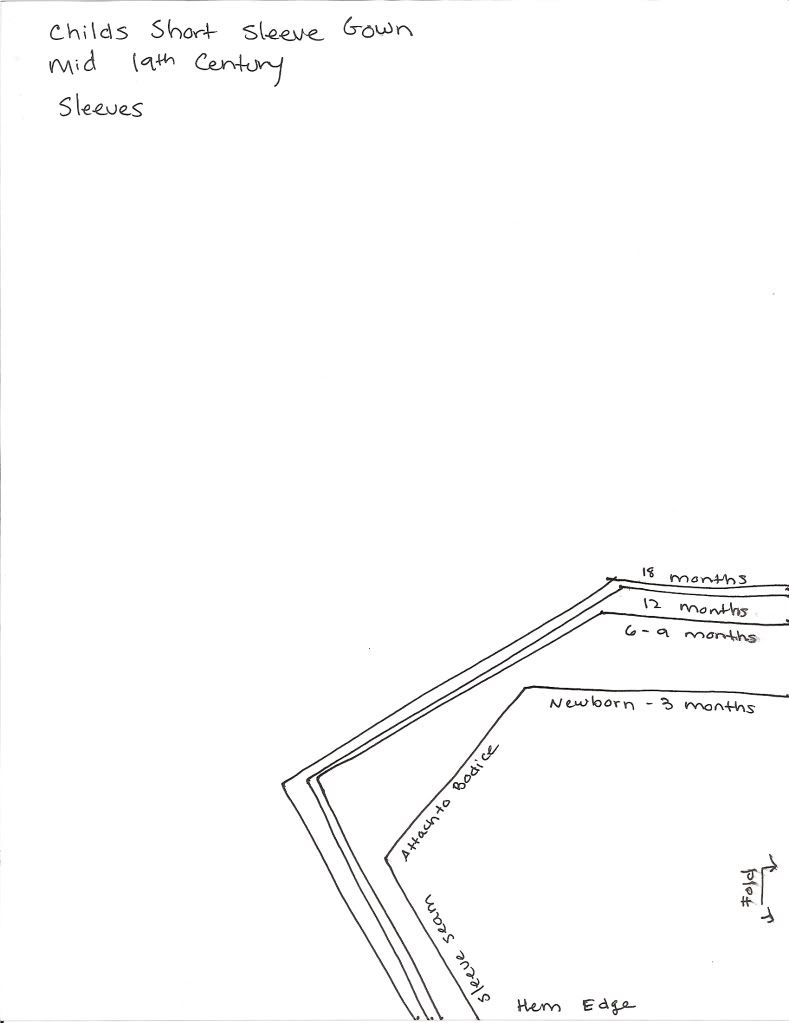
2 Sleeves, cut on the Fold
You will also need extra material to measure and cut:
1 Skirt Front and
1 Skirt Back*
*I usually make my infant and toddler skirts around 60” at the hem, although you may make yours larger if you wish. I would not go any smaller for fear of a skimpy looking skirt. For a baby 2 years of age and under 60” seems to be a good amount. For the length, measure from the natural waist to how long you wish the skirts to be (over the feet for infants and knee to mid-calf length for toddlers). Cut two rectangles your length measurement and half your width measurement to make the skirt pieces.
2 Waistbands
Measure around your childs waist and add at least 3” for seam allowance, overlap and ease. I like to make my waistbands 1” wide for little babies and 1 ½” wide for toddlers. To make an infant waistband cut a rectangle your waist measurement (plus extra for seam allowance, overlap and ease) by 2”. For a toddler waistband cut the length the same but the width at 2 ½”. This allows a ½” seam allowance on top and bottom of waistband for attaching to skirt and bodice.
Extra for Binding and Piping
Cut bias strips of leftover fabric 1 ½” wide for piping or binding at the neck and (optional) waistbands.
Construction: *all seams sewn with ½” seam allowance
Bodice:
Sew sleeves to bodice front, right sides together. Press seams in one direction and overcast by hand if your fabric is prone to ravel or fray. Sew sleeves to bodice backs and repeat pressing seams and overcasting, if needed.
Fold bodice in half, right sides together, so that the bodice front is facing up and the bodice back is below. Match sleeve seams at underarm and stitch bodice side seams and sleeve seams. Clip to seam at corner at underarm and press seam to the back, overcastting if necessary.
Press under scant ¼” to wrong side at center back opening. Fold bodice back again to the wrong side another 1”, making a self facing. Stitch self facing to bodice.
At this time, I find it convenient to hem the sleeves. Turn up a small hem and stitch in place by hand. (it is hard to machine hem an area this small).
Run gathering stitches around bodice neckline at front and back. Draw up gathering threads to about 18” (for toddlers) or 14” (For small babies) (or, measure desired neckline by draping a tape on your child and use that measurement). Finish off neckline by binding with bias strips or piping with self fabric piping, using a fine cord.
Run gathering stitches around bottom of bodice at front and back. Pull up to fit your childs waist measurement, plus extra for ease.
Waistband:
If desired, pipe both long edges of waistband with self fabric piping.
Pin waistband to bodice bottom, right sides together, extending waistband ½” on either side of bodice back opening. (these will later be tucked to the inside and covered by the waistband facing). Stitch.
Skirt:
Sew the side seams in your skirt pieces. Hem bottom edge and place tucks, if desired, at this time.
Cut a small slit in the center back skirt panel and clip horizontally ½” on either side of the bottom of the slit. Hem the slit, using the clipped ½” allowance. Fold one side of hemmed slit over the other. This will create a small pleat at the bottom. Stitch down.
Run gathering stitches around top of skirt at front and back. Pull up to fit childs waist measure plus extra for ease. Pin to raw edge of waistband, extending waistband ½” on either side of skirt placket. Stitch.
Waistband Facing:
Take the other waistband piece and press under ½” all around. Pin to waistband from inside the dress, covering all exposed edges and seam allowance. Tuck extended edges of outer waistband to inside of dress and cover with waistband facing. Stitch.
Trim as desired and enjoy your new creation!!
Variations:
This style has MANY potential variations! A few are:
Pleated bodice/skirt rather than gathered
Sleeves cut in a curved shape, scalloped shape or squared shape rather than plain with an angled underarm seam (as given in pattern)
Place the bodice pattern pieces farther from the fold/center line for more fabric in the center to gather ( I do this for many gowns I make).
You can also use this pattern to make a “petti-chemise” garment which combines shirt and petticoat for wear beneath an outer gown. Instead of gathering the neckline, sew on a casing and run a drawstring through to tie at the back. Instead of gathering the bodice edge, leave it plain and after the skirt is stitched to the bodice edge sew on a casing over the seam to insert a drawstring to tie at the back as well. Use light white cotton and if you desire, make plenty of tucks in the skirt to help the skirt of the gown stand out!
Here are some examples of gowns I have made using this pattern:
Petti-Chemises - white cotton with drawstring neck and waist and tucked skirts-

David‘s Baby Blue Summer Gown- light blue cotton gown with embroidered tape trim and tucks -

Blue Striped Gown - heavier blue and white cotton with scalloped, bound bias border on skirt, just above hem -

Dark Red Print Gown - cotton print with sleeves rounded at the hem and drawn up at the shoulder -

Judah’s Infant Gown - white cotton with bodice fullness taken up in tucks rather than gathers, and lace sewed between the tucks -

Red Checked Gown - Dark red check with sleeves rounded and finished at the hem with a bias cut ruffle -


Malachi's Blue Print Infant Gown - Blue cotton print with “waved braid” trim at neck and sleeve hems -


Sheer Checked Infant Gown - sheer checked cotton, made plain with squared sleeves -

 Striped Infant Gown - semi sheer cotton with sleeves made square and drawn up at shoulders -

Here are some original gowns that are similar in style:
Infant Gowns:
Tucked Baby Gown (my inspiration for Judah's Infant Gown)
Toddler and Girls Dresses: