
October 31, 2009
I have made several gowns from the excellent Elegant Lady's Closet Pattern from Sense and Sensibility. These gowns are in the style of early regency, and most appropriate for 1790's and very early 1800's impressions. My favorite is the "drawtring dress" which slips on over the head and the fit is adjusted with a drawstring at the waistline as well as the neckline. It is a pretty, easy to wear style and works well for maternity and nursing which is why I made a gown from this pattern in the first place!
I made a set of short stays a few years ago to get the proper "shelf" look of the regency era. While my first attempt did not come out badly, they no longer fit me correctly since the waist is now too loose and the bust much too small. (as my husband considerately noted, I might as well not make new clothes until I'm done bearing children since my shape changes with each new baby I have!) I wasn't overall pleased with the look of the short stays I made either. It gave a very high, rounded bustline which I felt rather self conscious about.
I decided to make some transitional stays in the style of these 1790s stays from Kent University:
_thumb.jpg) Katherine has made a lovely reproduction set as well as my dear friend Lauren. Check out their work - it is lovely!
Katherine has made a lovely reproduction set as well as my dear friend Lauren. Check out their work - it is lovely!For my own set, I first spent a lot of time in thought about the project. I really did not think I'd get around to making my own set for a while, at least til the New Year. But I wore one of my drawstring gowns to church this past weekend and was extremely unhappy with my short stays. I just can't wear them anymore. So until I get a new set made I have to wear my gowns with a modern push up bra, which I hate and find very uncomfortable. These new stays suddenly hopped to top priority on my "to sew" list.
So, first of all I had to make a pattern. I started from scratch and took my own measurements, which is a tricky and difficult thing. I made two rectangles to start with. My goal was to make a fitted band which closely hugged my ribcage area all around, beneath my bustline in front and a bit higher in the back. Once that was done, I drew seamlines on my pieces, having a front, side front, side, side back and back piece. I cut away a cup shape on each front piece for each breast to lie in. This was a little tricky since the cup line had to snugly hug the outline of each breast, which was fitted mainly by trial and error.
Once that was done, I made a mockup. I had to take in a little from the center back seam and had to narrow the side back pieces by 1/4" on each side. Then the stays fitted very snugly. Since these will lace closed in the front I want them to bit a bit too snug to start with since I know they will stretch a little with wearing.
Using an outer layer of white cotton twill and an interfacing layer of white cotton I sewed all the pieces together right sides together and pressed the seams open. I treated the twill and cotton layers as one. I took this construction method from the instructions in the J.P. Ryan Strapless Stays pattern. After some of the construction is done a lining layer will be pinned and hand stitched to the inside of the stays to cover all the seam allowances.
Once that was done I sewed a bone channel at each seam line, except the center back seamline. I cut two longish oval shapes for the gathered cups and gathered them to the cut out cup areas and sewed them in. The original stays appear to be more gathered than mine are, but I think the lady who wore the original stays must have had a slighter figure than mine. I don't think I'll get much gathering at the top of the cups either. But so long as they fit and give the right shape I will not be overly picky.
That is all I have done so far. Here is what I have finished thus far:
 Next I think I will sew in the lining. Then I have to make and attach the shoulder straps and all that is left is binding and making eyelets. These are going together much more quickly than I anticipated.
 Love,
Sarah
November 3, 2009
Well my stays are nearing completion but I think it will still be a few days before I finish them. I'm not really looking forward to binding the tabs on the bottom. I love the look, but I hate binding scallopy things.
Since posting last I have sewn in the lining by hand but have had the worst time with the cups. I have decided I hate cups. I am completely in love with gussets in comparison. Why is it so hard to fit an individual . . .for lack of a better word. . .um. . .chest gland?
The first cups I made (as shown in the picture in my last post) held them up, but they were too tight in places making little ripply hills instead of a smooth mound. For lack of better adjectives. So I sliced into the existing cups and found I had to add about 2" in width to each one to make them fit the roundness without squishing it. So I did that. That gave me extra to gather at the top of the cups too, which I liked. I quickly did the eyelets so I could lace the thing up and see how it fit. While the gathered cups fit the breast quite well, they did nothing at all to support it. Major droop issues.
So I took those out. I made a new cup piece shaped similarly to the old ones but with plenty of room at the bottom of the cup but fitted straight across (no gathers) at the top of the cup. That seemed to work pretty well so I went with it.
So that is about where I am at right now. I sewed binding to the cup seam and also to the top of the stays. I also made and attached the shoulder straps. I have slip stitched half of the binding to the stays and tried them on earlier today and I think despite the problems I've had with the durn cups I'm going to really like these! They are extremely comfortable, they support but no do lift the bosom up so much that it forms a plate beneath ones chin. I tried on one of my drawstring dresses over them and I think they will work perfectly. They position the bust in a place which lets the waistline of the dress fall at a nice place, just below the bosom and I do not get any cleavage since the busts are seperated.
 Next time, if/when I make this style again I think I will give myself some more room between the cups to get more of a seperate look. But then again, if I remain the same size I am afraid of getting a "wing" effect at the level of each armpit. Sigh. For now, I am very happy with the shape. But I am dreading binding those tabs! :)
Love,
Sarah
November 6, 2009
Well I finished the binding on the bottom this afternoon and it really wasn't as bad as I had thought. It took me longer to figure out how to apply the binding than it did to stitch it on.
The instructions in the J.P. Ryan stays says to pin the binding to the edge of the stays on both the right and the wrong sides, pulling the binding up between the tabs a bit.
I made my own binding from bias strips of twill. It was so bulky that pinning it did not work very well. I ended up stitching it with a half backstitch by hand to the right side of the corset and flipping it over and slip stitching it to the lining on the inside, while manipulating it around the curves by hand as I went. The binding looks bulky; I think next time I will use something much thinner and fine for the binding rather than bias strips of twill. But for a first attempt I am pretty satisfied.

All I need now is a good lace for this. The pink ribbon I've been using for try ons just is not the thing!
I'll try to get some pictures of it being worn within the next few days or so!
Love,
Sarah
 The sketch is bad, but it was a quicky drawing after a whole morning of laborious thought for me to go off of and reference as I made my pattern and mock ups. It has a shallow scoop neckline because that is an oft seen style in the 20's and is also more flattering to me than other styles. It has a front opening because I need nursing access and I didn't want to make a seperate nursing panel. (Most dresses from this period I have seen pictures of open in the back). The lining will be darted to fit and the outer layer will be gathered over the fitted lining. It has moderate size gigot sleeves. (Is there a different name for moderate size gigot sleeves??) I don't need huge sleeves and besides taking more fabric I think the bigger sleeves look ridiculous! I am comfortable with this size but would not go any bigger. At least theoretically on paper. It will have a waistband which will open to a dogleg closure and the skirt will be 3 panels of fabric gathered or gauged to the waistband. The skirt hem is to end just above the ankle, a good "active style" length.
 Then it was time to decide what fabric to use. I decided to use this pretty cream and pink cotton print that David gave me for Christmas last year. It is not exactly historically accurate but it is pretty. He will be pleased I am finally using it. I first tore 3 panels for the skirt, full width and 38" long. I then tore a strip full width and 2.5" wide for the waistband. I then folded the width in half lengthwise and positioned my bodice pieces on it and cut them out.
 After I cut both sleeves, I cut off the little folded piece and added 1" allowance to the cut edge. I cut four of these pieces from scrap. They will be sewn to the sleeves to get the finished shape and I don't think the seams will be very noticeable. This method allowed me to get both sleeves from 31" of fabric - half of what it would have taken if I had folded the fabric lengthwise and cut both sleeves on the fold that way!
  Out of the remaining 1/3 yard of fabric I cut a multitude of bias strips for piping. I plan to pipe all the bodice seams, the waistband and the sleeve seams.
 I threaded the machine and laid everything out so whenever I get the chance I can start sewing the bodice pieces together!
 This morning I tried the bodice on inside out and pinned it shut down the front. I took up darts in the lining fabric only and pinned them in place. Most original gowns I've seen have only one dart on each side of the front but I had so much extra fabric at the waist, I really had to make two darts on each side to get the right contour to the bust and for everything to lay nicely.
  *Note: It is usually not recommended that you pin in darts with your inside out bodice on you. This is because when you turn your bodice right sides out, the side you fitted to, for example, your left bust, will now be on your right bust, and vice versa. If your body is noticeably different on either side, it is highly recommened that you make all darts in a muslin and transfer the muslin to paper, clearly marking "left" and "right" so your final product will fit correctly. I hate bothering with this so I never do it. But for those of you who want to take the time to fit something perfectly, this is what is suggested to do.
 Once the darts were pinned I sewed them in place. Then I gathered the outer fabric down over the darts, and sewed on the waistband. I left 1/2" extending on either edge - the cut edge of the waistband is not flush with the finished bodice edge. This is so later I can turn it to the inside and cover it with the inner waistband.
  I was getting a little tired of working on the dress by this time but thought I should at least pipe the armscyes on the bodice, so I did. I then ran gathering stitches across the tops of the sleeves and drew them up. And that was all I cared to do at the time. Next up is sewing the sleeves into the bodice and then turning my thoughts to the skirt. . .
 Love,
Love, To close, the skirt is first fastened and the bodice then lapped and fastened. This is how it will look when it is shut:
  I then tore a scrap of white cotton into a strip 2.5" wide and about 34" long to use as the waistband facing. I pressed under 1/2" on all raw edges and laid it wrong side down over the waistband on the inside of the dress. I pinned it to the seam lines, enclosing the seam allowances. Here, it is just pinned but since this time I have slip stitched most of the waistband facing to the waistband.
  Then to get an idea of what the dress will look like when it is finished, I put it on my homemade dressform (who is in urgent need of re-shaping and re-stuffing) and pinned it shut. I'm happy with how it looks so far! The skirt is gathered in the front just under the bust gathers per an original dress I've seen photos of (I have pics of the original dress on my Sangamon Settler blog, if anyone wants to see it - it is lovely!) The sides of the skirt are ungathered for a few inches on each side and the back is very tightly gathered.
  Now I must finish attaching the waistband facing and make the hem and the dress is ready for fasteners! :)
 Then, the facing was pressed up inside the skirt and pinned in place. A teeny bit of skirt fabric was turned under as well, just so there is no danger of the white facing showing from the outside! :) I used a running stitch with small stitches on the outside and larger ones on the inside to attach the facing by hand.
  This is a quick and easy way to do a hem and can be done on any rectangular skirt. The hem facing will also take the abuse of wear and can be replaced once it gets dingy and dirty (I have done this before!) thus protecting the dress fabric from getting tatty at the hem prematurely.


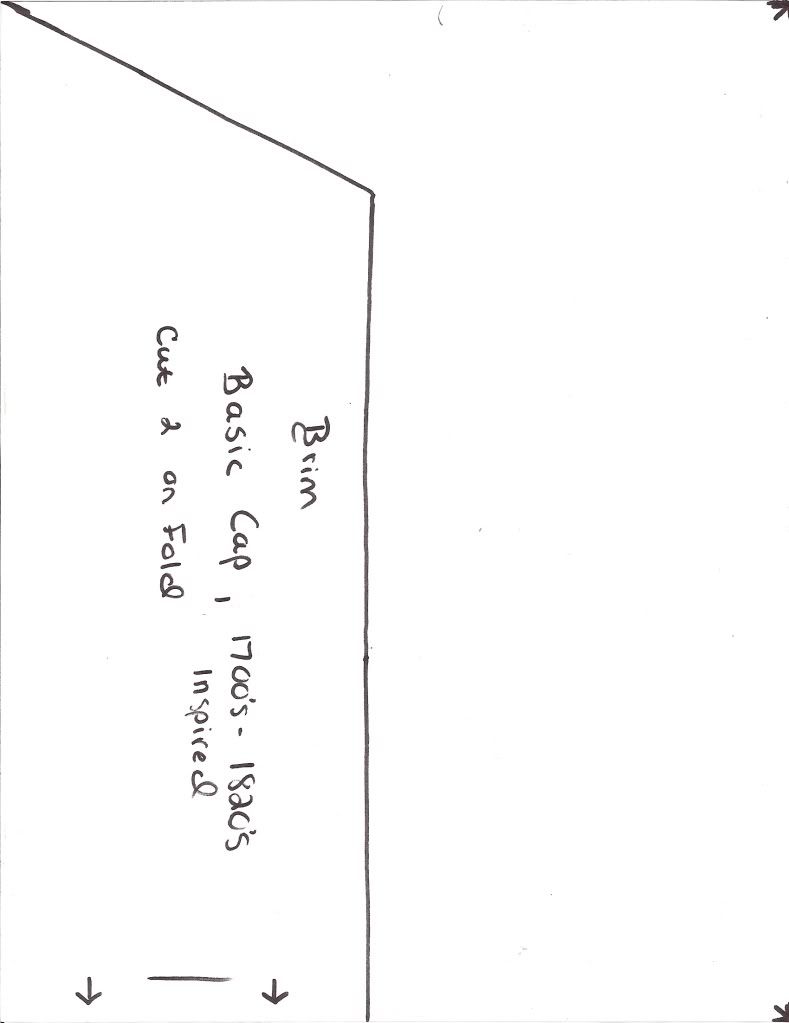
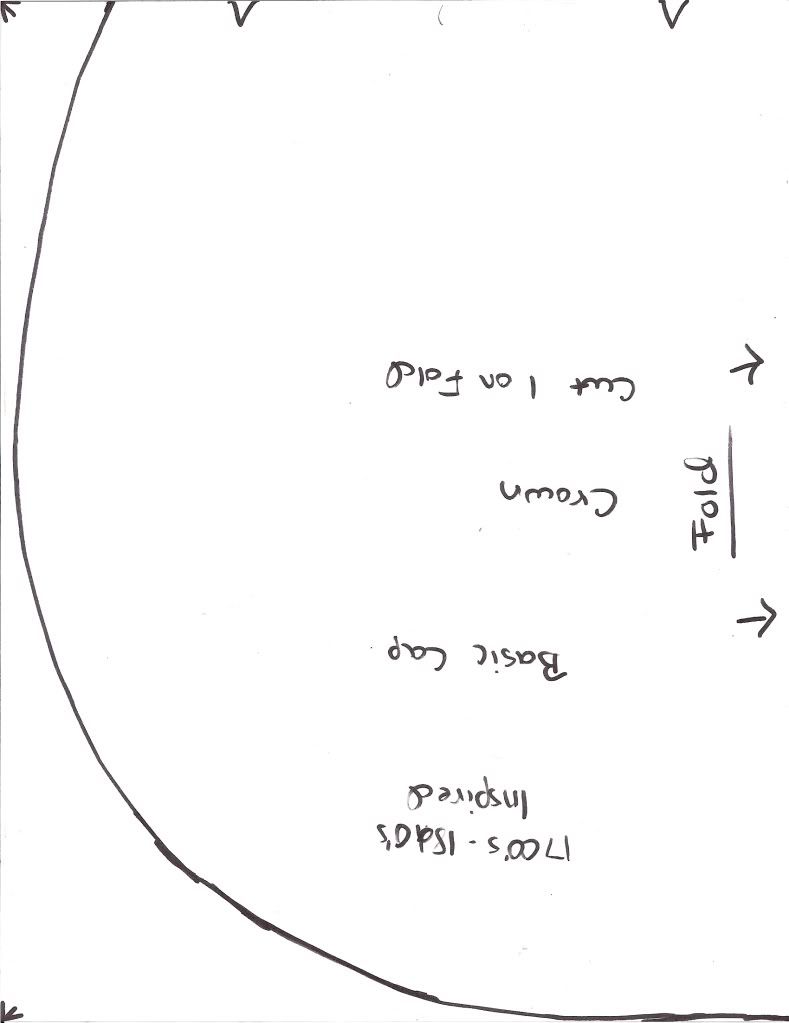
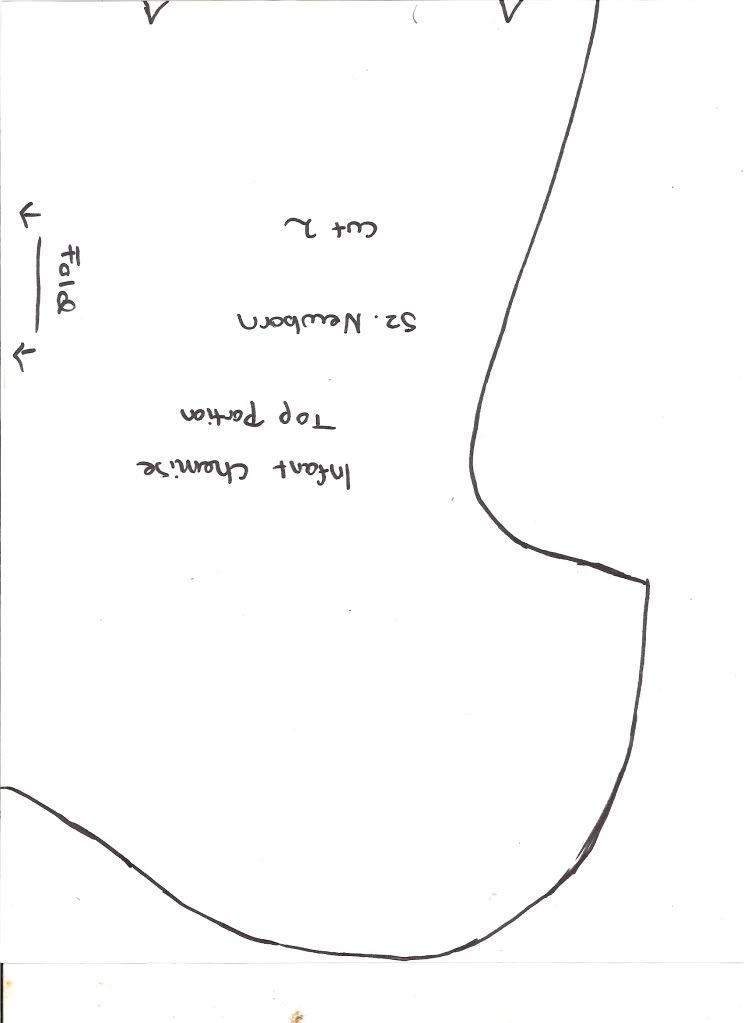
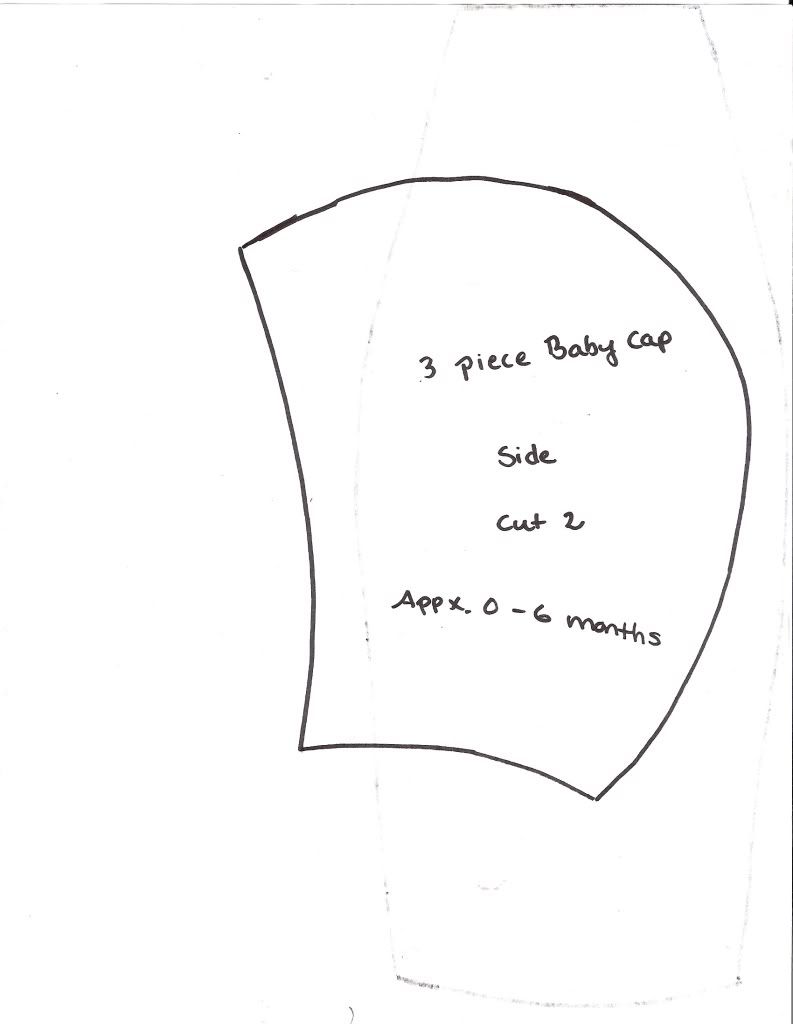
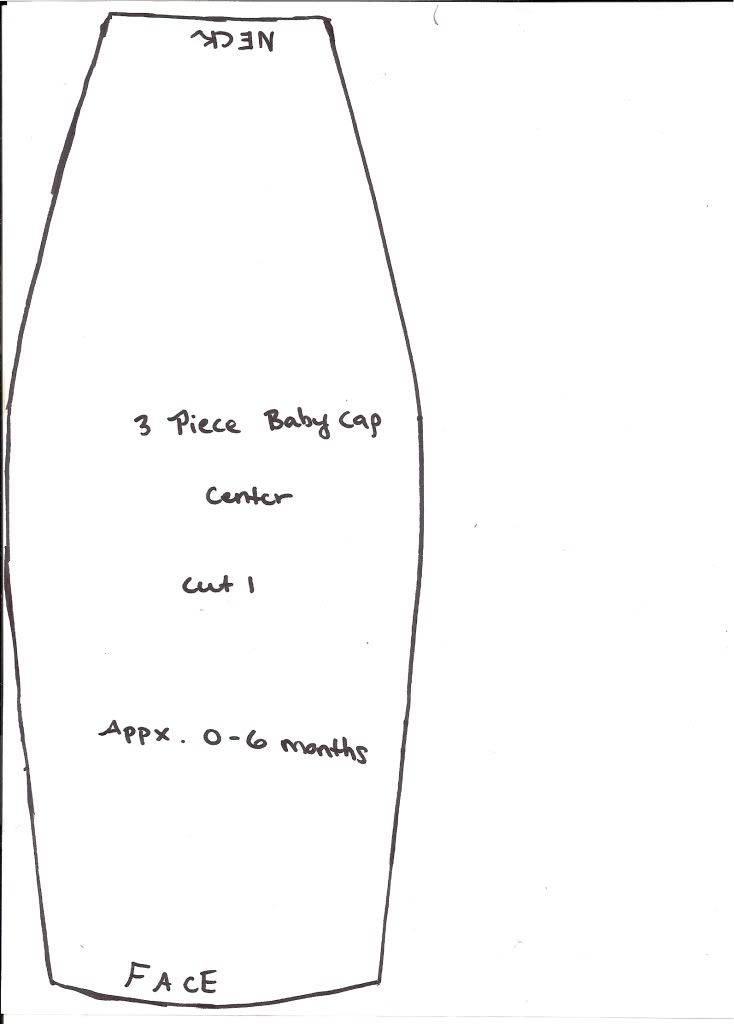
 This simple cap has a fitted brim and a semi circular, puffed crown that can be adjusted to fit with drawstrings at the neck. Although this cap is not taken directly from any particular period, I think it looks best with late 18th century and early 19th century styled/inspired gowns since the way the crown is shaped conveniently accommodates the hairstyles of the time. This pattern could also be used for a cozy nightcap, made out of cotton for summertime wear or flannel (wool or canton) for cooler weather.
  Using the same pattern with heavier fabrics resulted in a warm and cozy bonnet like cap. This one is made of deep blue velvet and has a 2 piece brim with the lower brim being brown cotton twill.
  The crown is lined with cream colored silk and black ribbon used for the ties.

 This pattern creates a raised bosom, tubular look so popular in the early 19th century. I first made a mockup of the unaltered regency pattern but decided the tubular look was not what I wanted. The 1820's were a time of transition and I wanted some more waist definition and I did not want my bosom right up under my chin! I am a bit busty, very short waisted and have larger hips. The tube thing just doesn't do it for me. I'd gladly give up some of my hip girth for a more slender line but after three babies that is just not going to happen!
 The final mock up fit wonderfully! I traced each pattern piece off onto fresh paper. Here are my altered pieces:
 Next step: Cutting out the "real" fabric and sewing up the shell and the lining. For that I plan to use gray cotton twill for the outer layer and a white striped cotton for the lining. Once the corset is corded I may fell in an additional lining layer but we'll see when the times comes!
  So I made a cup of coffee and browsed some more online images of corsets, especially the ones from the
  The channels are all sewn and bones are inserted into the (your) left side. . .I held them up to me and I think they will work very well. With this boning placement, the final stays will have twelve bones, although I may add an extra bone to each seam between the side/back pieces, giving me a total of fourteen bones. I did not leave an area for a busk, since I want these to be flexible and I never used a busk with my last set of corded stays. I do have channels for bone where the wood busk would have been, if I had chose to use it.
  Back:
Back:  Side: As you can see I used 3 bones down the center of the stays instead of the more period correct busk pocket and busk. I did this because I figured I would never use a real busk and that more support there was better.
  I started making a dress to be worn over these stays and soon realized that I would have to make a modification down the center front. While the bones down the center front gave great tummy support they made an odd little ridge at the center front bust line. This line would usually be straightened by a straight busk, but the boning is not that stiff and bends to my form. It "cups" over my bosom and pokes up above the bust line - not a pretty sight when worn with a fitted dress!
  This took care of the pokey ridge problem. The corded center section cups my bosom but it gently curves and conforms rather that sticking up oddly! Problem solved! Whew! I think these are DONE now! :)
  Love,
Love,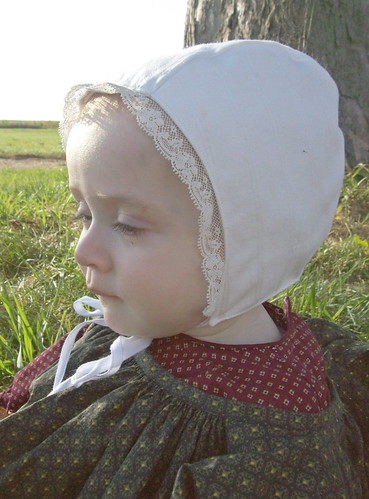
