~ Laura Ingalls Wilder The Long Winter

This pattern is one I came up with after watching the t.v. series Little House on the Prairie. I grew up watching the series and was delighted to discover it on our public television station this past year and was enchanted anew with the costumes of Ma, Laura, Mary and their friends and family. This bonnet is particularly modeled after the one the adult Laura wears in the later episodes. Mrs. Oleson also wears a very similar styled bonnet when in her less-flamboyant attire. :) This bonnet is sized adult. The fit is large and roomy, with plenty of space for coiled hair or braids. The brim shades the face from the sun and is edged with a delicate ruffle. The back neck is elasticized and has an ample curtain to shade your neck from the sun.
Note:* The instructions seem really confusing to me so I have taken photographs of the whole construction process so you hopefully have a better idea of how this goes together! Of course there are many different ways you could go about putting this together so feel free to deviate from my instructions as needed. :) It is really a very simple project.
Note: ** To alter for size: You can easily size this pattern up or down as needed. As is, it fits an average adult head quite roomily. The basic pattern shapes of brim and crown can be easily made to whatever size you need.
To alter the width, measure your head (or the head you are making this for) from the back top of head, straight out over the face. Make sure this measurement takes into account the width of any ruffle you will attach. Mark this length along the fold line of the brim pattern piece and add or subtract from the pattern lines as needed to get the width you desire.
To alter the length, measure over your head from ear to ear. Mark this measurement along the long straight edge of the brim pattern piece and add or subtract from the pattern lines as needed to get your desired length.
The crown will probably not need to be reduced much in width for smaller sizes unless you are making a very small infant bonnet. Smaller sizes will find the crown more "puffy" but not by too much. Since the crown is not fitted, the cut is very forgiving in terms of size. To increase the size of the crown, add LENGTH to it as needed, above the casing line. Unless you have a very large head or a very large hairdo it is unlikely you will need to add width to the crown. If you do, simply place the pattern piece a few inches from the fold when pinning to your fabric to get added width across the center. To decrease the size of the crown, measure from the back top of the head, "poufing" your measuring tape a little to approximate the pouf of the finished crown, to the back of the neck. Add a few inches to this measurement for the neck curtain and mark this measurement along the straight fold line of the crown. Subtract from the pattern lines as needed. To decrease width, measure from ear to ear across the back of the head, adding in ample ease for movement while wearing. You can "pouf" your measuring tape for this measurement too. Mark half of this measurement along the casing line and subtract from the pattern width as needed. Draw new lines to connect the lines of your new size, keeping as best you can to the original pattern shapes.
The measurement for a ruffle should be about 1.5 - 2 x the length of the curved brim line.
The ties should be long enough to neatly tie beneath the chin.
The casing should be 1.5" wide (finished width of about 3/4" when hemmed on each side) and as long as the casing line on the crown.
Materials:You will need the following for your bonnet:
Appx. ¾ yard of cotton fabric. Calico or gingham or plaid is a good choice. Something light is nice for summer wear. Bear in mind darker colored cottons will visually fade more quickly than a light one.
Scrap of heavy cotton fabric for interfacing. Cotton canvas, duck, denim (old jeans work well), twill, etc. are all good choices.
8” of flat elastic, ½” wide
Thread
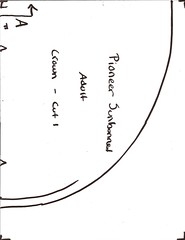
Pattern:Please click on the following links to be taken to the files for the pattern pieces. These pieces are traced and scanned on standard computer paper so should be printed full size. In case of size discrepancy, I have the actual measurements of each piece written on the edges of the pattern pieces so double check the measurements to make sure of the size before cutting your fabric. You will have to tape the crown piece together as it did not fit on one sheet of paper.
Brim Crown A Crown BCutting:From your fabric cut the following:
2 Brims from your fashion fabric
1 Brim from your interfacing fabric
1 Crown from your fashion fabric
You will also need to tear these pieces from left over fabric:
1 Ruffle - 3” x 45”
2 Ties - 3” x 22.5” (tear a 45” rectangle and cut in half)
1 Casing for elastic, 1.5” x 19”
Assembly:1. Hem the crown. On the casing line, clip into the crown ½. Turn under and stitch a very narrow hem on the bottom edge of the crown and up the sides to the clip.

2. On your casing piece, turn under ¼” on each long side. Laying one long edge of the casing piece along the casing line, wrong side of casing to right side of crown, pin into place. Stitch very close the turned under edge to secure the casing to the crown.
4. Run two rows of gathering stitches along the curved edge of the crown, from just above the casing, across the top of the crown, to just above the casing on the other side.

5. Hem the ruffle. On long edge of ruffle turn under a narrow hem and stitch securely. On the other long end, run two rows of gathering stitches.

6. Lay your brim interfacing piece right side up. Lay one of the brim fashion fabric pieces on top of the interfacing piece, right side up. You will treat the two layers as one. Press securely and fold and press to find center.

7. Fold the ruffle piece lengthwise to find center. Matching center points of ruffle and brim, right sides together, pin ruffle to brim all along curved outside edge, gathering ruffle to fit brim edge.

At either end of ruffle, fold the corner up to the inside of the brim.

Stitch ruffle to brim with ruffle side up, stitching between the two rows of gathering.

Remove gathering stitches and press ruffle towards inside of brim.
8. Lay the other brim fashion fabric piece right sides up. Lay the ruffled brim piece right side down on top of this piece. Pin brim to ruffled brim and stitch together along curved outside edge, using the seam you just sewed for attaching the ruffle as a guide.

Trim seam allowance and turn brim right sides out. Press well.

9. To stiffen brim, stitch parallel rows of machine stitching across the curved outer edge of the brim. Start about ½” from the edge for your first row. How many rows you wish to stitch and how far apart you place the rows is entirely up to you. I like to space my rows about ¾” apart and like to use an odd number of rows. 5 or 7 rows look well and adequately stiffens the brim.

10. Now that your brim is complete, it is time to attach it to the crown! First, take your elastic and thread it through the casing on the crown, pinning at each end to secure. Stitch over the ends of the elastic to hold them in place and remove pins.

11. Right sides together, pin brim to crown, matching edge of brim to the raw edges of the crown. Draw up gathering stitches in crown to fit brim and distribute evenly. Stitch. Trim seam allowances. Turn bonnet right sides out and press.
12. Attach ties by sewing to seam allowance at the bottom edge of the brim.
13. To finish inside seam, cover seam with bias binding or hem lace. Stitch to cover seam allowance.

14. Enjoy your new bonnet!


 Fabrics. com had a great sale on this wool early last year for around $1.70 a yard or something like that. It was less than $2 a yard, whatever the exact price may have been. I ordered a bunch of it since it was such a good price but didn't have any real idea what I was going to make from it. When I received the fabric I noticed it had a thin silver stripe in it, a nice lightweight hand and lots of body. It was a lovely fabric, mostly wool with a mix of silk.
  The skirt is made of three 60" panels and is pleated to a brown cotton fabric waistband and whip stitched on. The skirt is basted to the bodice around most of the bodice, leaving the point in the front hanging free.
 I have worn this dress quite often since I made it. I need to bone the center front point and the darts to make the fit more smooth but now that my figure has changed after having the baby, I think I may just remake the whole bodice anyway with leftover wool to get a better fit.
 I have worn this dress to dances, a birthday party for Abraham Lincoln as well as to colder events where the wool keeps me cozy. I'm so glad I made it. It has definitely become a wardrobe staple! Now I understand why black dresses, either silk or wool, were so common in the period. They are nice basic canvases to dress up with different accessories and are appropriate for almost all occasions in almost all types of weather. I am not crazy about the color of the silk I used to trim it with but suprisingly I have received more compliments on the combination of this color and black than any of the other dresses I've ever made. So I'm starting to think it might be all right, too. :)
  This is another dress made with $1.50/yard fabric from Wal Mart. I really found some great deals at Wal Mart this past year, I tell you what. I love this print and despite only having five yards of it, was able to (barely) squeak out this dress with a few inch square pieces left over in case I ever need to patch or repair this dress.
 The trim on this dress is of dark red braid and is applied with large basting stitches - just enough to hold it in place but easy to take off if I ever need to. The trim is inspired by similar trim on an original wool dress of the period. The original dress had narrower braid but this was the best I find in my local stores. It is a rayon braid but for now, until I can afford to purchase more accurate trim, it works.
  The dress is accessorized with a small gold brooch and a baste-in white collar made of one layer of muslin with lace trim whipped to the edges.
  The sleeves I had to get creative with. I had very little fabric to work with so chose a very slim fitting coat sleeve with a small puff at the top. The puff is sewn directly to the coat sleeve beneath it - the inner sleeve fits fairly closely to the arm. The puff had to be pieced but it is not noticeable and piecing is accurate for dresses of this period anyway.
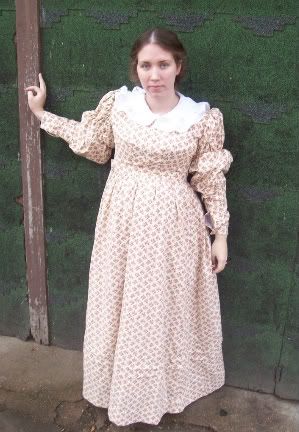 This dress was my first attempt at an 1820's style dress. I made it in the fall of 2008 when I was pregnant with Malachi, so therefore this dress has some non-characteristic features to better accomodate my growing tummy and for nursing after the baby was born. I made my own pattern for the dress based on diagrams in Janet Arnolds Patterns of Fashion 1 and seeing pictures of original dresses online, especially ones from
 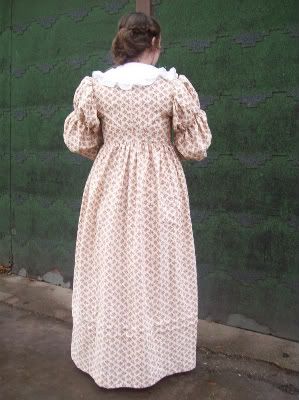 The skirt is made of three gores in the front and sides and a rectangular panel in the back. The front of the skirt is very lightly gathered so the skirt would drape well over my tummy. The back is more heavily gathered. The skirt has a wide hem and two tucks and has a dogleg opening - another deviation from the more common straight back opening, or less common apron front opening that were options of the period. I took the dogleg concept from the 1860's since it works well for a skirt that does not open in the front, but an attached bodice that does. This is so I could unfasten the bodice to nurse the baby. I don't know if original 1820's dresses ever used this method of fastening. So far, I have not seen one that does.
  I made a detchable ruffled collar to wear with this dress but usually do not wear it. It can be basted into the neckline if I wish. I took this idea from the detchable baste-in collars of the 1860's. A more period option would have been to attach the collar to a full chemisette that is worn under the dress and tied round the waist.
 It is a basic mid-19th century style cotton dress. The bodice is flat lined and the lining darted with the fashion fabric taken up in tucks (instead of darts) on the outside layer. The neck is cut in a slight V, which is a nice, yet accurate variation from the ubiquitous jewel neckline. The V neck shape is much more flattering on many figure types than the jewel neckline. The sleeves are one piece coat sleeves with a pleated sleeve cap and trimmed with black cotton. The armscyes and neckline are piped. The dress has a narrow piped waistband and a full pleated skirt, whipped directly to the edge of the waistband as per originals. The hem is finished with a hem facing from scrap cotton fabric. Closes down the front of the bodice with hook and eyes and a dogleg closure for the skirt.
  Since these pictures were taken, I have added another row of black trim to the sleeves and black decorative buttons down the front. A comfortable, easy-to-wear every day dress! In these pictures I am wearing a black bow at the neckline and a black belt that hooks closed in the back. This dress is also the one I wore when David and I had our tintype done in September of 2009.