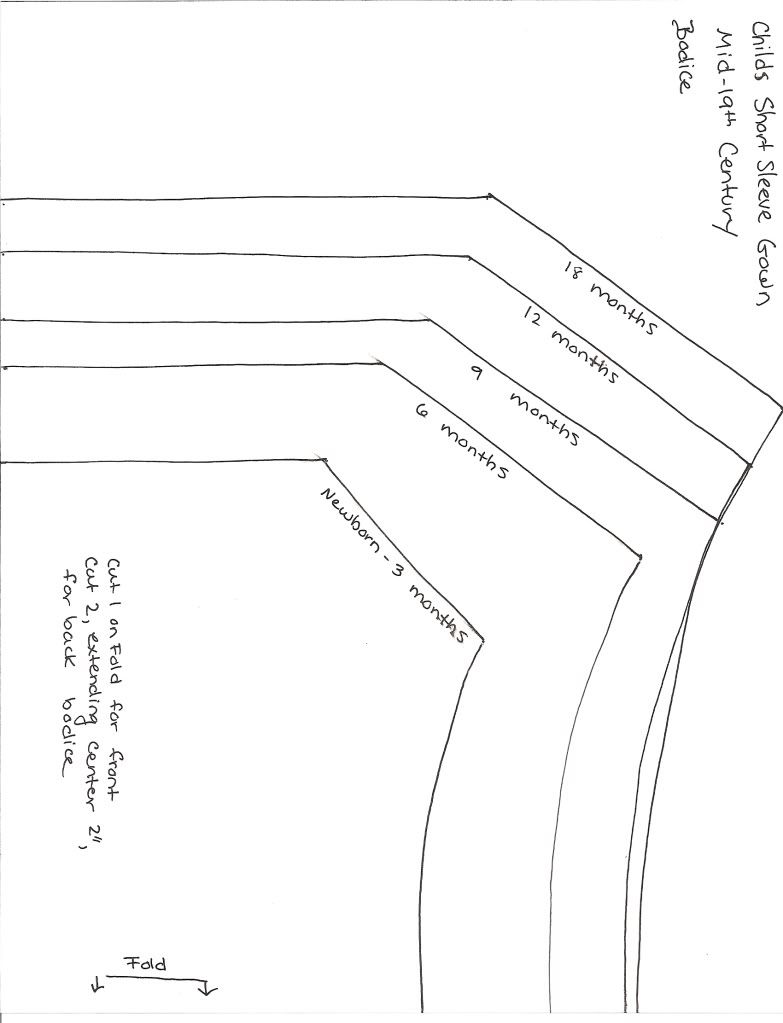
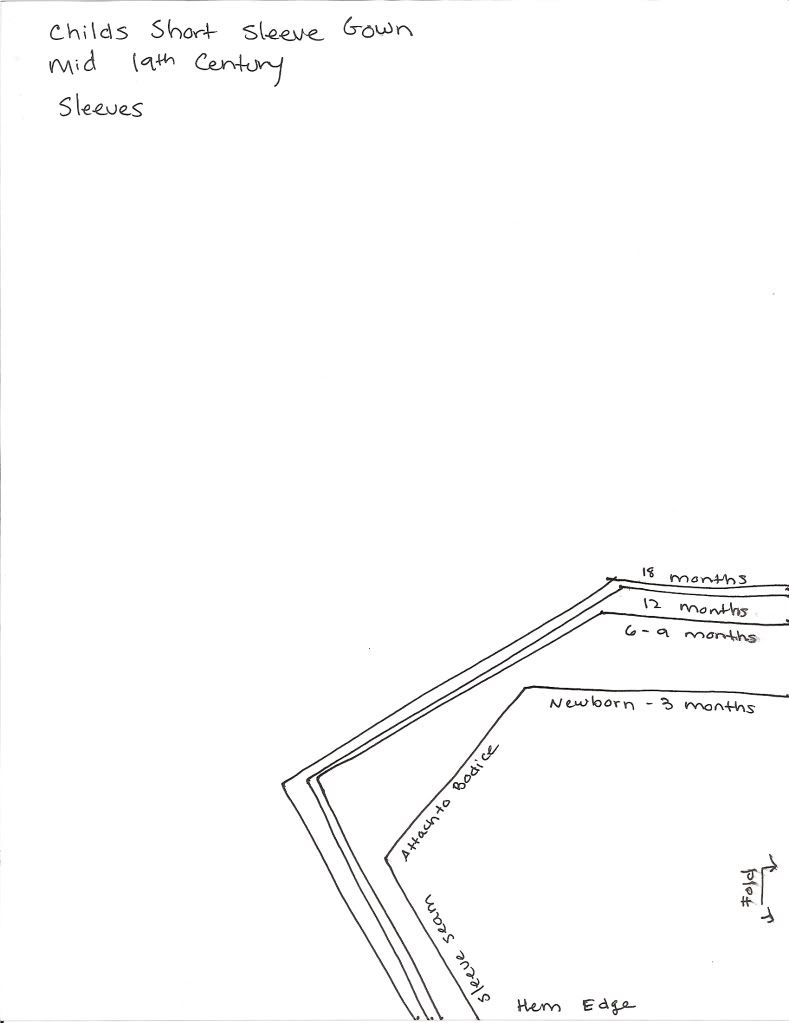
This is one of my all time favorite styles to make for my little boys for Civil War reenacting. The style goes together very quickly and it is easy to adjust to their figures and comfortable to wear.
An infants gown takes approximately 1 and ½ to 2 yards of fabric, depending on how long you want to make the skirts (at least below feet level) and a toddlers dress takes 1 yard to 1 ½ yards, depending on how full you wish the skirts to be, if tucked, how many tucks and how wide you want your hem to be.
For washability and wearability, make of a nice cotton fabric. This style is suitable for babies and little boys until they are "breeched" and for little girls until they adopt women's styles of clothing. Given here are sizes newborn -18 months. Bigger sizes to follow as my boys get bigger and I draw out more pattern sizes! :)
To make this dress you will need the following pieces:
You will also need extra material to measure and cut:
1 Skirt Front and
1 Skirt Back*
*I usually make my infant and toddler skirts around 60” at the hem, although you may make yours larger if you wish. I would not go any smaller for fear of a skimpy looking skirt. For a baby 2 years of age and under 60” seems to be a good amount. For the length, measure from the natural waist to how long you wish the skirts to be (over the feet for infants and knee to mid-calf length for toddlers). Cut two rectangles your length measurement and half your width measurement to make the skirt pieces.
2 Waistbands
Measure around your childs waist and add at least 3” for seam allowance, overlap and ease. I like to make my waistbands 1” wide for little babies and 1 ½” wide for toddlers. To make an infant waistband cut a rectangle your waist measurement (plus extra for seam allowance, overlap and ease) by 2”. For a toddler waistband cut the length the same but the width at 2 ½”. This allows a ½” seam allowance on top and bottom of waistband for attaching to skirt and bodice.
Extra for Binding and Piping
Cut bias strips of leftover fabric 1 ½” wide for piping or binding at the neck and (optional) waistbands.
Construction: *all seams sewn with ½” seam allowance
Bodice:
Sew sleeves to bodice front, right sides together. Press seams in one direction and overcast by hand if your fabric is prone to ravel or fray. Sew sleeves to bodice backs and repeat pressing seams and overcasting, if needed.
Fold bodice in half, right sides together, so that the bodice front is facing up and the bodice back is below. Match sleeve seams at underarm and stitch bodice side seams and sleeve seams. Clip to seam at corner at underarm and press seam to the back, overcastting if necessary.
Press under scant ¼” to wrong side at center back opening. Fold bodice back again to the wrong side another 1”, making a self facing. Stitch self facing to bodice.
At this time, I find it convenient to hem the sleeves. Turn up a small hem and stitch in place by hand. (it is hard to machine hem an area this small).
Run gathering stitches around bodice neckline at front and back. Draw up gathering threads to about 18” (for toddlers) or 14” (For small babies) (or, measure desired neckline by draping a tape on your child and use that measurement). Finish off neckline by binding with bias strips or piping with self fabric piping, using a fine cord.
Run gathering stitches around bottom of bodice at front and back. Pull up to fit your childs waist measurement, plus extra for ease.
Waistband:
If desired, pipe both long edges of waistband with self fabric piping.
Pin waistband to bodice bottom, right sides together, extending waistband ½” on either side of bodice back opening. (these will later be tucked to the inside and covered by the waistband facing). Stitch.
Skirt:
Sew the side seams in your skirt pieces. Hem bottom edge and place tucks, if desired, at this time.
Cut a small slit in the center back skirt panel and clip horizontally ½” on either side of the bottom of the slit. Hem the slit, using the clipped ½” allowance. Fold one side of hemmed slit over the other. This will create a small pleat at the bottom. Stitch down.
Run gathering stitches around top of skirt at front and back. Pull up to fit childs waist measure plus extra for ease. Pin to raw edge of waistband, extending waistband ½” on either side of skirt placket. Stitch.
Waistband Facing:
Take the other waistband piece and press under ½” all around. Pin to waistband from inside the dress, covering all exposed edges and seam allowance. Tuck extended edges of outer waistband to inside of dress and cover with waistband facing. Stitch.
Trim as desired and enjoy your new creation!!
Variations:
This style has MANY potential variations! A few are:
Pleated bodice/skirt rather than gathered
Sleeves cut in a curved shape, scalloped shape or squared shape rather than plain with an angled underarm seam (as given in pattern)
Place the bodice pattern pieces farther from the fold/center line for more fabric in the center to gather ( I do this for many gowns I make).
You can also use this pattern to make a “petti-chemise” garment which combines shirt and petticoat for wear beneath an outer gown. Instead of gathering the neckline, sew on a casing and run a drawstring through to tie at the back. Instead of gathering the bodice edge, leave it plain and after the skirt is stitched to the bodice edge sew on a casing over the seam to insert a drawstring to tie at the back as well. Use light white cotton and if you desire, make plenty of tucks in the skirt to help the skirt of the gown stand out!
Here are some examples of gowns I have made using this pattern:
Petti-Chemises - white cotton with drawstring neck and waist and tucked skirts-

David‘s Baby Blue Summer Gown- light blue cotton gown with embroidered tape trim and tucks - 
Blue Striped Gown - heavier blue and white cotton with scalloped, bound bias border on skirt, just above hem - 
Dark Red Print Gown - cotton print with sleeves rounded at the hem and drawn up at the shoulder - 
Judah’s Infant Gown - white cotton with bodice fullness taken up in tucks rather than gathers, and lace sewed between the tucks - 
Red Checked Gown - Dark red check with sleeves rounded and finished at the hem with a bias cut ruffle -


Malachi's Blue Print Infant Gown - Blue cotton print with “waved braid” trim at neck and sleeve hems - 


Sheer Checked Infant Gown - sheer checked cotton, made plain with squared sleeves - 
 Striped Infant Gown - semi sheer cotton with sleeves made square and drawn up at shoulders -

Here are some original gowns that are similar in style:

 This is another mid-to-late 1820’s style dress. It has a dart fitted bodice with a scoop neckline and my usual dog leg closure. The sleeves are a variation from the ubiquitous gigot sleeve of the period, and are cut slightly wider and gathered at the wrist into a fitted cuff, following a period diagram.
  The skirt makes thrifty use of fabric and is cut as three gores in the front at the sides with a rectangular panel in the back. The gores were constructed of a straight panel folded in half. The front gore was marked out and cut, with the leftover pieces, after the gore was cut away, being turned and used as side gores. You can use this technique with any fabric that is not a one-way print. The skirt is lightly gathered in the front and is more tightly gathered in the back.
  To dress up this gown a bit more than the others I have made, I added a gathered ruffle or flounce to the bottom of the skirt. The join is covered with a bias band. I also made a cranberry taffeta sash to wear around my waist and two cranberry taffeta bows to pin at the shoulders for a bit of a dressier look. The sash and bows are not worn for everyday wear.

 This dress is made from a dull green cotton print that I found at Wal Mart. The base color is a lighter dull green with tiny dark green rectangles printed on it. I made the dress up in an early 1830’s style, with puff sleeves gathered to a fitted under sleeve, a V-neck and a full, evenly gathered skirt.
  All the bodice seams and the sleeve seams are piped with self fabric piping. The front closes with hook and eyes and the skirt is set with a dogleg closure. Dresses of this period usually closed in the back but I have chosen this method of closing because it is much easier to put on oneself (I find it hard to hook up back-fastening dresses on myself!) and I need a front opening to nurse my baby. It is a historical way of closing a dress but not necessarily correct to the 1830’s era.
 Drawers were usually not worn in this period but since I feel a bit indecent without them I am wearing modern knit leggings in place of drawers. I ought to be wearing a collar or chemisette but usually do not use these for every day wear. The pin is an antique copper brooch, given to be my aunt, set with a green stone. I don’t know how old it is or what kind of stone it is but I like how it looks. I love green.
 The skirt is made of three 60" panels and is pleated to a brown cotton fabric waistband and whip stitched on. The skirt is basted to the bodice around most of the bodice, leaving the point in the front hanging free.
 I have worn this dress quite often since I made it. I need to bone the center front point and the darts to make the fit more smooth but now that my figure has changed after having the baby, I think I may just remake the whole bodice anyway with leftover wool to get a better fit.
 I have worn this dress to dances, a birthday party for Abraham Lincoln as well as to colder events where the wool keeps me cozy. I'm so glad I made it. It has definitely become a wardrobe staple! Now I understand why black dresses, either silk or wool, were so common in the period. They are nice basic canvases to dress up with different accessories and are appropriate for almost all occasions in almost all types of weather. I am not crazy about the color of the silk I used to trim it with but suprisingly I have received more compliments on the combination of this color and black than any of the other dresses I've ever made. So I'm starting to think it might be all right, too. :)
  This is another dress made with $1.50/yard fabric from Wal Mart. I really found some great deals at Wal Mart this past year, I tell you what. I love this print and despite only having five yards of it, was able to (barely) squeak out this dress with a few inch square pieces left over in case I ever need to patch or repair this dress.
 The trim on this dress is of dark red braid and is applied with large basting stitches - just enough to hold it in place but easy to take off if I ever need to. The trim is inspired by similar trim on an original wool dress of the period. The original dress had narrower braid but this was the best I find in my local stores. It is a rayon braid but for now, until I can afford to purchase more accurate trim, it works.
  The dress is accessorized with a small gold brooch and a baste-in white collar made of one layer of muslin with lace trim whipped to the edges.
  The sleeves I had to get creative with. I had very little fabric to work with so chose a very slim fitting coat sleeve with a small puff at the top. The puff is sewn directly to the coat sleeve beneath it - the inner sleeve fits fairly closely to the arm. The puff had to be pieced but it is not noticeable and piecing is accurate for dresses of this period anyway.
 This dress was my first attempt at an 1820's style dress. I made it in the fall of 2008 when I was pregnant with Malachi, so therefore this dress has some non-characteristic features to better accomodate my growing tummy and for nursing after the baby was born. I made my own pattern for the dress based on diagrams in Janet Arnolds Patterns of Fashion 1 and seeing pictures of original dresses online, especially ones from
  The skirt is made of three gores in the front and sides and a rectangular panel in the back. The front of the skirt is very lightly gathered so the skirt would drape well over my tummy. The back is more heavily gathered. The skirt has a wide hem and two tucks and has a dogleg opening - another deviation from the more common straight back opening, or less common apron front opening that were options of the period. I took the dogleg concept from the 1860's since it works well for a skirt that does not open in the front, but an attached bodice that does. This is so I could unfasten the bodice to nurse the baby. I don't know if original 1820's dresses ever used this method of fastening. So far, I have not seen one that does.
  I made a detchable ruffled collar to wear with this dress but usually do not wear it. It can be basted into the neckline if I wish. I took this idea from the detchable baste-in collars of the 1860's. A more period option would have been to attach the collar to a full chemisette that is worn under the dress and tied round the waist.
 It is a basic mid-19th century style cotton dress. The bodice is flat lined and the lining darted with the fashion fabric taken up in tucks (instead of darts) on the outside layer. The neck is cut in a slight V, which is a nice, yet accurate variation from the ubiquitous jewel neckline. The V neck shape is much more flattering on many figure types than the jewel neckline. The sleeves are one piece coat sleeves with a pleated sleeve cap and trimmed with black cotton. The armscyes and neckline are piped. The dress has a narrow piped waistband and a full pleated skirt, whipped directly to the edge of the waistband as per originals. The hem is finished with a hem facing from scrap cotton fabric. Closes down the front of the bodice with hook and eyes and a dogleg closure for the skirt.
  Since these pictures were taken, I have added another row of black trim to the sleeves and black decorative buttons down the front. A comfortable, easy-to-wear every day dress! In these pictures I am wearing a black bow at the neckline and a black belt that hooks closed in the back. This dress is also the one I wore when David and I had our tintype done in September of 2009.
 The sketch is bad, but it was a quicky drawing after a whole morning of laborious thought for me to go off of and reference as I made my pattern and mock ups. It has a shallow scoop neckline because that is an oft seen style in the 20's and is also more flattering to me than other styles. It has a front opening because I need nursing access and I didn't want to make a seperate nursing panel. (Most dresses from this period I have seen pictures of open in the back). The lining will be darted to fit and the outer layer will be gathered over the fitted lining. It has moderate size gigot sleeves. (Is there a different name for moderate size gigot sleeves??) I don't need huge sleeves and besides taking more fabric I think the bigger sleeves look ridiculous! I am comfortable with this size but would not go any bigger. At least theoretically on paper. It will have a waistband which will open to a dogleg closure and the skirt will be 3 panels of fabric gathered or gauged to the waistband. The skirt hem is to end just above the ankle, a good "active style" length.
 Then it was time to decide what fabric to use. I decided to use this pretty cream and pink cotton print that David gave me for Christmas last year. It is not exactly historically accurate but it is pretty. He will be pleased I am finally using it. I first tore 3 panels for the skirt, full width and 38" long. I then tore a strip full width and 2.5" wide for the waistband. I then folded the width in half lengthwise and positioned my bodice pieces on it and cut them out.
 After I cut both sleeves, I cut off the little folded piece and added 1" allowance to the cut edge. I cut four of these pieces from scrap. They will be sewn to the sleeves to get the finished shape and I don't think the seams will be very noticeable. This method allowed me to get both sleeves from 31" of fabric - half of what it would have taken if I had folded the fabric lengthwise and cut both sleeves on the fold that way!
  Out of the remaining 1/3 yard of fabric I cut a multitude of bias strips for piping. I plan to pipe all the bodice seams, the waistband and the sleeve seams.
 I threaded the machine and laid everything out so whenever I get the chance I can start sewing the bodice pieces together!
 This morning I tried the bodice on inside out and pinned it shut down the front. I took up darts in the lining fabric only and pinned them in place. Most original gowns I've seen have only one dart on each side of the front but I had so much extra fabric at the waist, I really had to make two darts on each side to get the right contour to the bust and for everything to lay nicely.
  *Note: It is usually not recommended that you pin in darts with your inside out bodice on you. This is because when you turn your bodice right sides out, the side you fitted to, for example, your left bust, will now be on your right bust, and vice versa. If your body is noticeably different on either side, it is highly recommened that you make all darts in a muslin and transfer the muslin to paper, clearly marking "left" and "right" so your final product will fit correctly. I hate bothering with this so I never do it. But for those of you who want to take the time to fit something perfectly, this is what is suggested to do.
 Once the darts were pinned I sewed them in place. Then I gathered the outer fabric down over the darts, and sewed on the waistband. I left 1/2" extending on either edge - the cut edge of the waistband is not flush with the finished bodice edge. This is so later I can turn it to the inside and cover it with the inner waistband.
  I was getting a little tired of working on the dress by this time but thought I should at least pipe the armscyes on the bodice, so I did. I then ran gathering stitches across the tops of the sleeves and drew them up. And that was all I cared to do at the time. Next up is sewing the sleeves into the bodice and then turning my thoughts to the skirt. . .
 Love,
Love, To close, the skirt is first fastened and the bodice then lapped and fastened. This is how it will look when it is shut:
  I then tore a scrap of white cotton into a strip 2.5" wide and about 34" long to use as the waistband facing. I pressed under 1/2" on all raw edges and laid it wrong side down over the waistband on the inside of the dress. I pinned it to the seam lines, enclosing the seam allowances. Here, it is just pinned but since this time I have slip stitched most of the waistband facing to the waistband.
  Then to get an idea of what the dress will look like when it is finished, I put it on my homemade dressform (who is in urgent need of re-shaping and re-stuffing) and pinned it shut. I'm happy with how it looks so far! The skirt is gathered in the front just under the bust gathers per an original dress I've seen photos of (I have pics of the original dress on my Sangamon Settler blog, if anyone wants to see it - it is lovely!) The sides of the skirt are ungathered for a few inches on each side and the back is very tightly gathered.
  Now I must finish attaching the waistband facing and make the hem and the dress is ready for fasteners! :)
 Then, the facing was pressed up inside the skirt and pinned in place. A teeny bit of skirt fabric was turned under as well, just so there is no danger of the white facing showing from the outside! :) I used a running stitch with small stitches on the outside and larger ones on the inside to attach the facing by hand.
  This is a quick and easy way to do a hem and can be done on any rectangular skirt. The hem facing will also take the abuse of wear and can be replaced once it gets dingy and dirty (I have done this before!) thus protecting the dress fabric from getting tatty at the hem prematurely.