Showing posts with label Toddler. Show all posts

Mid-19th Century Infant and Toddler Short Sleeve Gown


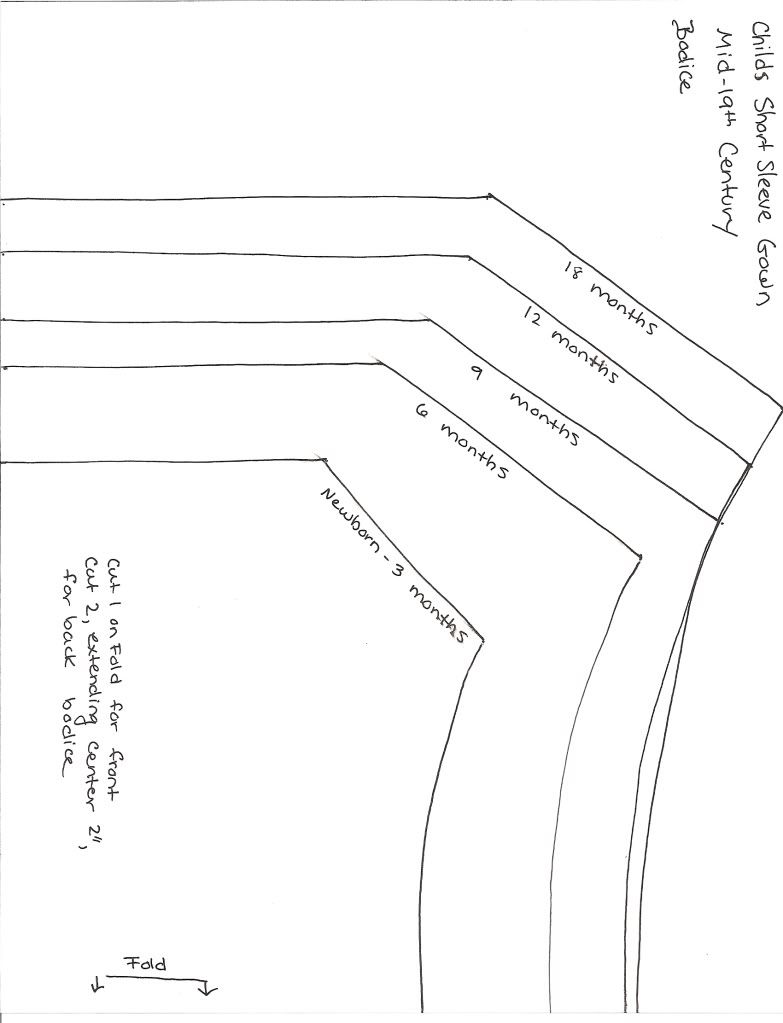
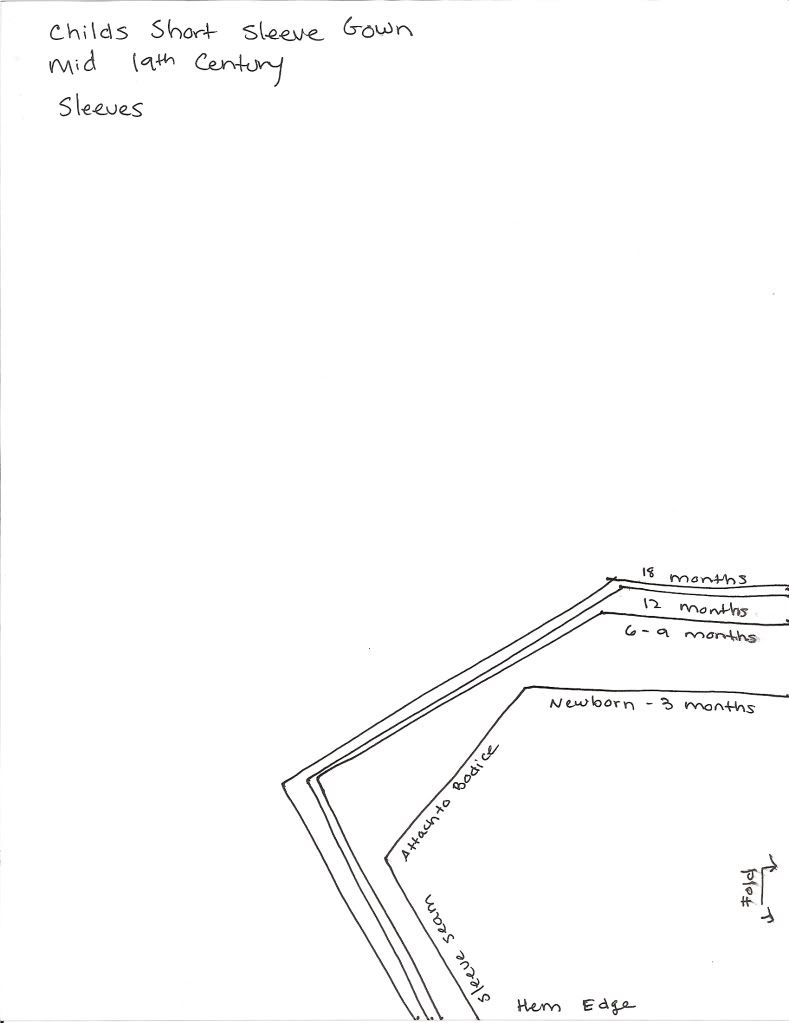
Infants/Childs Mid-19th Century Short Sleeve Gown

This is one of my all time favorite styles to make for my little boys for Civil War reenacting. The style goes together very quickly and it is easy to adjust to their figures and comfortable to wear.

An infants gown takes approximately 1 and ½ to 2 yards of fabric, depending on how long you want to make the skirts (at least below feet level) and a toddlers dress takes 1 yard to 1 ½ yards, depending on how full you wish the skirts to be, if tucked, how many tucks and how wide you want your hem to be.

For washability and wearability, make of a nice cotton fabric. This style is suitable for babies and little boys until they are "breeched" and for little girls until they adopt women's styles of clothing. Given here are sizes newborn -18 months. Bigger sizes to follow as my boys get bigger and I draw out more pattern sizes! :)

To make this dress you will need the following pieces:

1 Bodice Front, cut on Fold
2 Bodice Backs, cut with the center line extended 2” (this was the fold line for Bodice Front)
2 Sleeves, cut on the Fold

You will also need extra material to measure and cut:

1 Skirt Front and
1 Skirt Back*
*I usually make my infant and toddler skirts around 60” at the hem, although you may make yours larger if you wish. I would not go any smaller for fear of a skimpy looking skirt. For a baby 2 years of age and under 60” seems to be a good amount. For the length, measure from the natural waist to how long you wish the skirts to be (over the feet for infants and knee to mid-calf length for toddlers). Cut two rectangles your length measurement and half your width measurement to make the skirt pieces.

2 Waistbands
Measure around your childs waist and add at least 3” for seam allowance, overlap and ease. I like to make my waistbands 1” wide for little babies and 1 ½” wide for toddlers. To make an infant waistband cut a rectangle your waist measurement (plus extra for seam allowance, overlap and ease) by 2”. For a toddler waistband cut the length the same but the width at 2 ½”. This allows a ½” seam allowance on top and bottom of waistband for attaching to skirt and bodice.

Extra for Binding and Piping
Cut bias strips of leftover fabric 1 ½” wide for piping or binding at the neck and (optional) waistbands.

Construction: *all seams sewn with ½” seam allowance

Bodice:

Sew sleeves to bodice front, right sides together. Press seams in one direction and overcast by hand if your fabric is prone to ravel or fray. Sew sleeves to bodice backs and repeat pressing seams and overcasting, if needed.

Fold bodice in half, right sides together, so that the bodice front is facing up and the bodice back is below. Match sleeve seams at underarm and stitch bodice side seams and sleeve seams. Clip to seam at corner at underarm and press seam to the back, overcastting if necessary.

Press under scant ¼” to wrong side at center back opening. Fold bodice back again to the wrong side another 1”, making a self facing. Stitch self facing to bodice.

At this time, I find it convenient to hem the sleeves. Turn up a small hem and stitch in place by hand. (it is hard to machine hem an area this small).

Run gathering stitches around bodice neckline at front and back. Draw up gathering threads to about 18” (for toddlers) or 14” (For small babies) (or, measure desired neckline by draping a tape on your child and use that measurement). Finish off neckline by binding with bias strips or piping with self fabric piping, using a fine cord.

Run gathering stitches around bottom of bodice at front and back. Pull up to fit your childs waist measurement, plus extra for ease.

Waistband:

If desired, pipe both long edges of waistband with self fabric piping.

Pin waistband to bodice bottom, right sides together, extending waistband ½” on either side of bodice back opening. (these will later be tucked to the inside and covered by the waistband facing). Stitch.

Skirt:

Sew the side seams in your skirt pieces. Hem bottom edge and place tucks, if desired, at this time.

Cut a small slit in the center back skirt panel and clip horizontally ½” on either side of the bottom of the slit. Hem the slit, using the clipped ½” allowance. Fold one side of hemmed slit over the other. This will create a small pleat at the bottom. Stitch down.

Run gathering stitches around top of skirt at front and back. Pull up to fit childs waist measure plus extra for ease. Pin to raw edge of waistband, extending waistband ½” on either side of skirt placket. Stitch.

Waistband Facing:

Take the other waistband piece and press under ½” all around. Pin to waistband from inside the dress, covering all exposed edges and seam allowance. Tuck extended edges of outer waistband to inside of dress and cover with waistband facing. Stitch.

Trim as desired and enjoy your new creation!!

Variations:

This style has MANY potential variations! A few are:

Pleated bodice/skirt rather than gathered

Sleeves cut in a curved shape, scalloped shape or squared shape rather than plain with an angled underarm seam (as given in pattern)

Place the bodice pattern pieces farther from the fold/center line for more fabric in the center to gather ( I do this for many gowns I make).

You can also use this pattern to make a “petti-chemise” garment which combines shirt and petticoat for wear beneath an outer gown. Instead of gathering the neckline, sew on a casing and run a drawstring through to tie at the back. Instead of gathering the bodice edge, leave it plain and after the skirt is stitched to the bodice edge sew on a casing over the seam to insert a drawstring to tie at the back as well. Use light white cotton and if you desire, make plenty of tucks in the skirt to help the skirt of the gown stand out!

Here are some examples of gowns I have made using this pattern:

Petti-Chemises - white cotton with drawstring neck and waist and tucked skirts-

David‘s Baby Blue Summer Gown- light blue cotton gown with embroidered tape trim and tucks -
Blue Striped Gown - heavier blue and white cotton with scalloped, bound bias border on skirt, just above hem -
Dark Red Print Gown - cotton print with sleeves rounded at the hem and drawn up at the shoulder -
Judah’s Infant Gown - white cotton with bodice fullness taken up in tucks rather than gathers, and lace sewed between the tucks -
Red Checked Gown - Dark red check with sleeves rounded and finished at the hem with a bias cut ruffle -


Malachi's Blue Print Infant Gown - Blue cotton print with “waved braid” trim at neck and sleeve hems -
Sheer Checked Infant Gown - sheer checked cotton, made plain with squared sleeves -
Striped Infant Gown - semi sheer cotton with sleeves made square and drawn up at shoulders -
Here are some original gowns that are similar in style:
Infant Gowns:
Tucked Baby Gown (my inspiration for Judah's Infant Gown)
Toddler and Girls Dresses:

Mid-19th Century Winter Hood

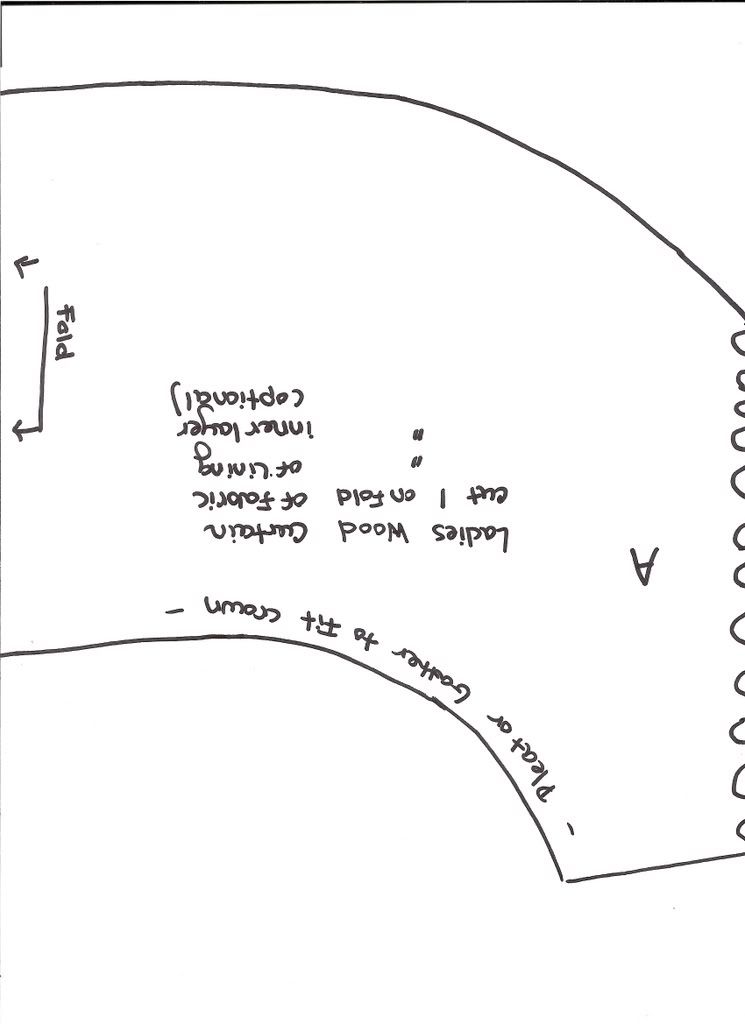
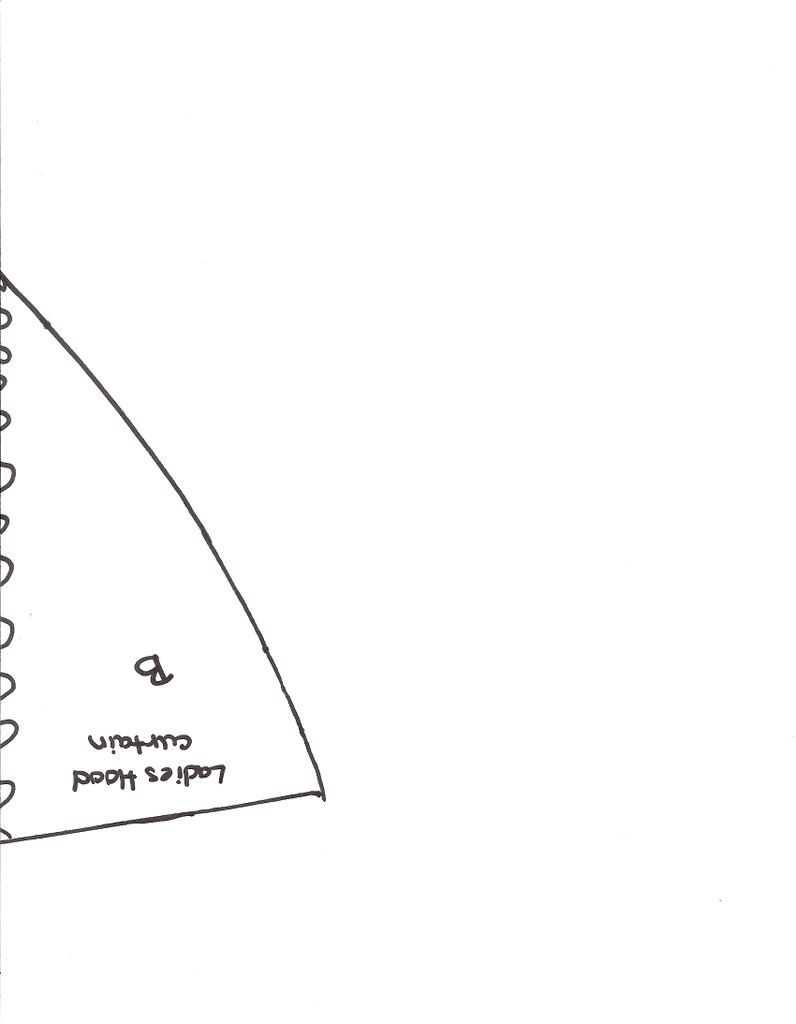
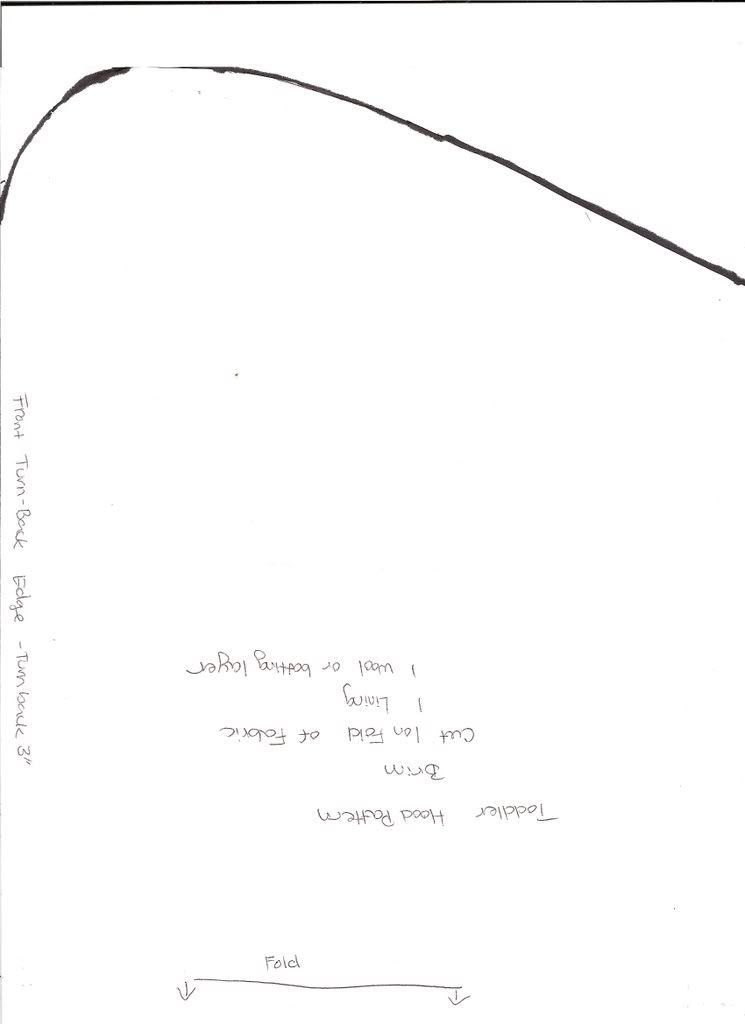
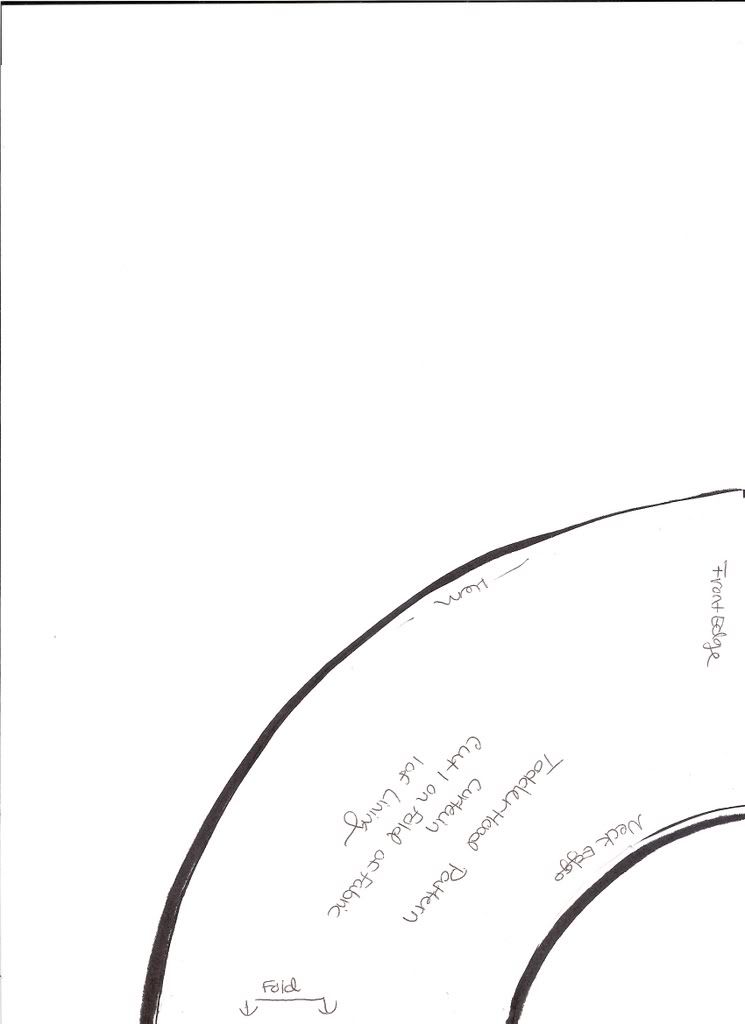
The patterns given here create a warm, comfortable winter hood for both women and toddlers. The shape is appropriate for mid-19th century and a hood is a wonderful thing to have for chilly mornings at Civil War reenactments, or for use in historic settings (or modern, if you dare!) in the colder months of the year.

For practicality, make your hood out of wool for the outer layer. For the lining, choose anything that is slippery - silk, polished cotton, etc. For my boys I used plain cotton to line the hoods with so I could easily clean them. At their age they tend to get everything they wear quite filthy! For the ladies hood I used silk for the lining.

You might also wish to add (and I strongly recommend) an inner layer of insulating fabric (read: wool) or wool batting. This can be quilted just to the lining or may be quilted to both the lining and outer layer like a sandwich.

You will need the following pattern pieces:

Women:
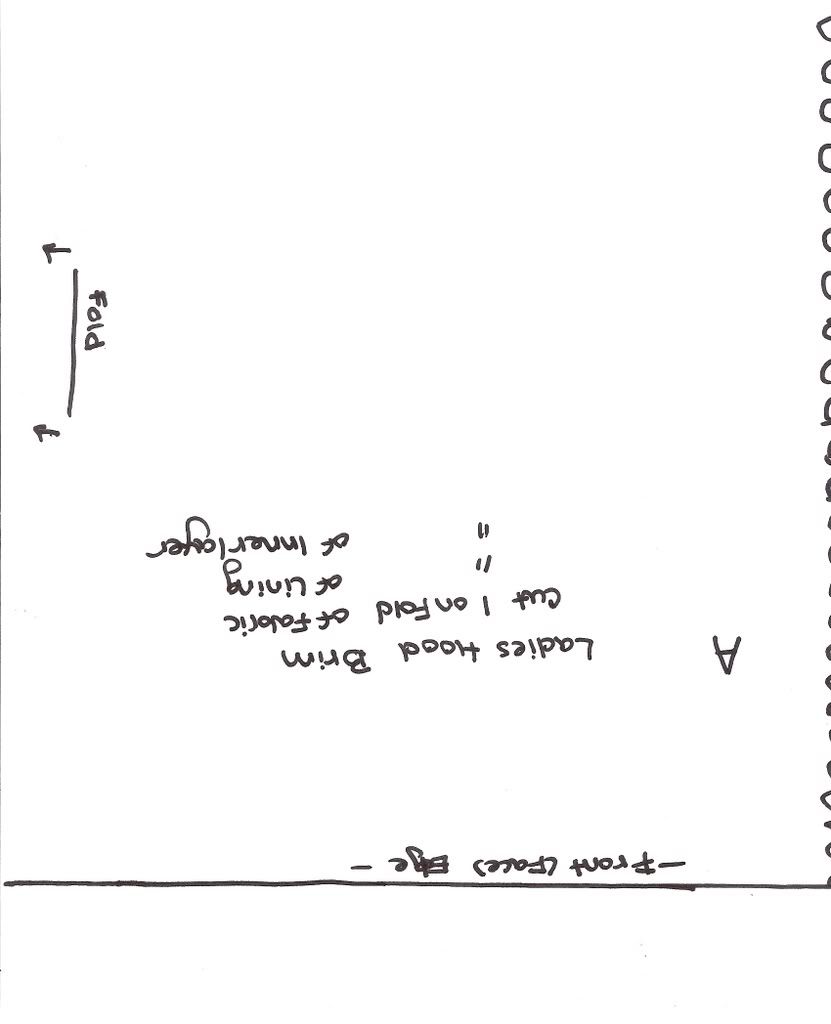
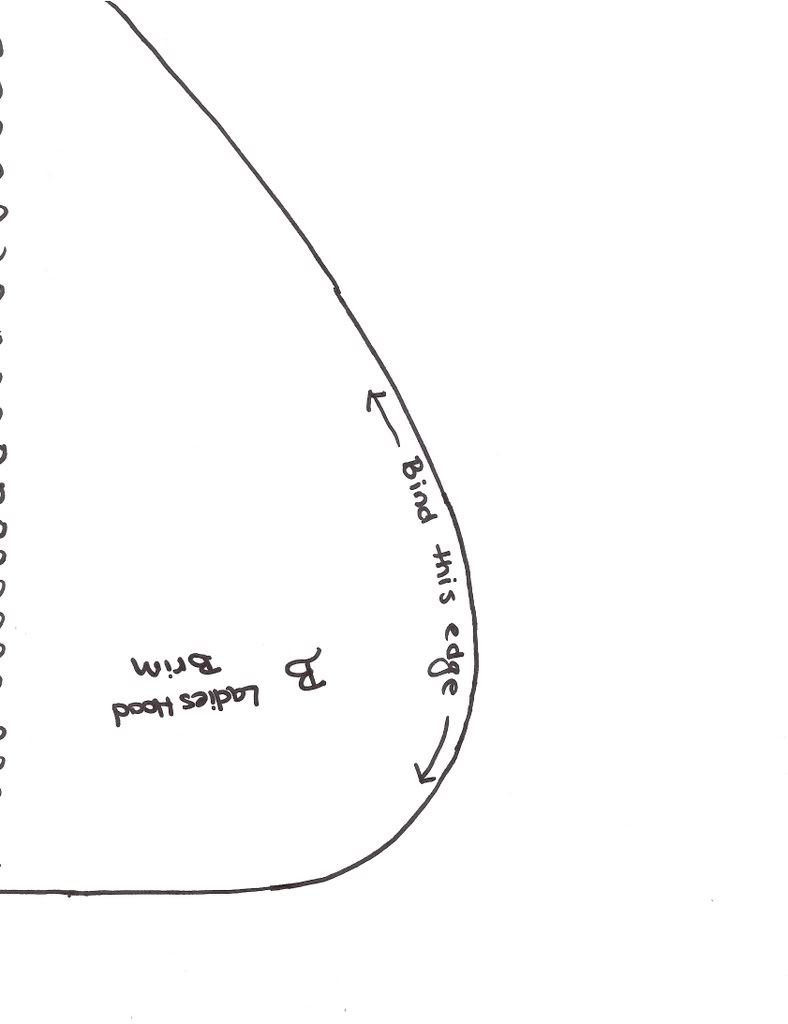
Brim A

Brim B (tape to A)

Crown

Curtain A

Curtain B (tape to A)

Toddler:


You will also need to reserve some fabric to make ties, if desired. You could also use ribbon for ties if you would rather.

From your fabric cut the following:

Brim - 1 in Fashion Fabric, 1 in Lining, and 1 in Insulating Layer (if you are using wool batting for this layer, also cut an additional lining piece so you can sandwich the wool between the two while quilting. This makes it far easier to quilt and also reduces shedding wool which can creep up between the fibers of your outer layer).

Crown - 1 in Fashion Fabric, 1 in Lining, and 1 in Insulating Layer. If using wool batt, see information as for brim.

Curtain - 1 in Fasion Fabric, 1 in Lining and 1 in Insulating Layer. (if fashion fabric is quite heavy/bulky I usually do not put batting in the curtain. Wool flannel is a good choice to use for the insulating layer here).

Construction:

Brim

For Brim Quilted Through All Layers ~ stack your lining piece, inner piece and fashion fabric piece on top of each other. Make sure the right side of your lining is facing DOWN and the right side of your fashion fabric is facing UP. Baste together. Quilt as desired.
For Brim Quilted Through Bottom Layer Only ~ stack your lining piece, inner piece and additional lining piece on top of each other. Make sure the right side of your bottom lining is facing DOWN. Quilt as desired.

To finish brim, cut strips of binding fabric on the bias to the length needed to go around the face edge of brim and the short, curved edges. Bind.

Crown:

Stack your lining, inner layer and fashion fabric on top of each other. Quilt as for brim above.

Pin crown into brim, matching edges. The crown should ease into the brim with no pleats or easing stitches necessary. If you find you do need pleats or easing stitches, put those in so the crown and brim fit neatly. Stitch with a 1/2" seam allowance. Finish seam with binding.

Curtain:

Lay your fashion fabric and lining right sides together. Stitch with a 1/2" seam allowance along short edges and long, circular curved edge. Trim seam and turn right sides out. Press well.

Pleat the straight edge of your crown to fit the back of your neck comfortably. Pleat the raw edge of the curtain to the same measurement. Pin curtain to crown and stitch with a 1/2" seam allowance. Bind this seam as well.

To finish:

Add ties and decorations as desired!
Enjoy!

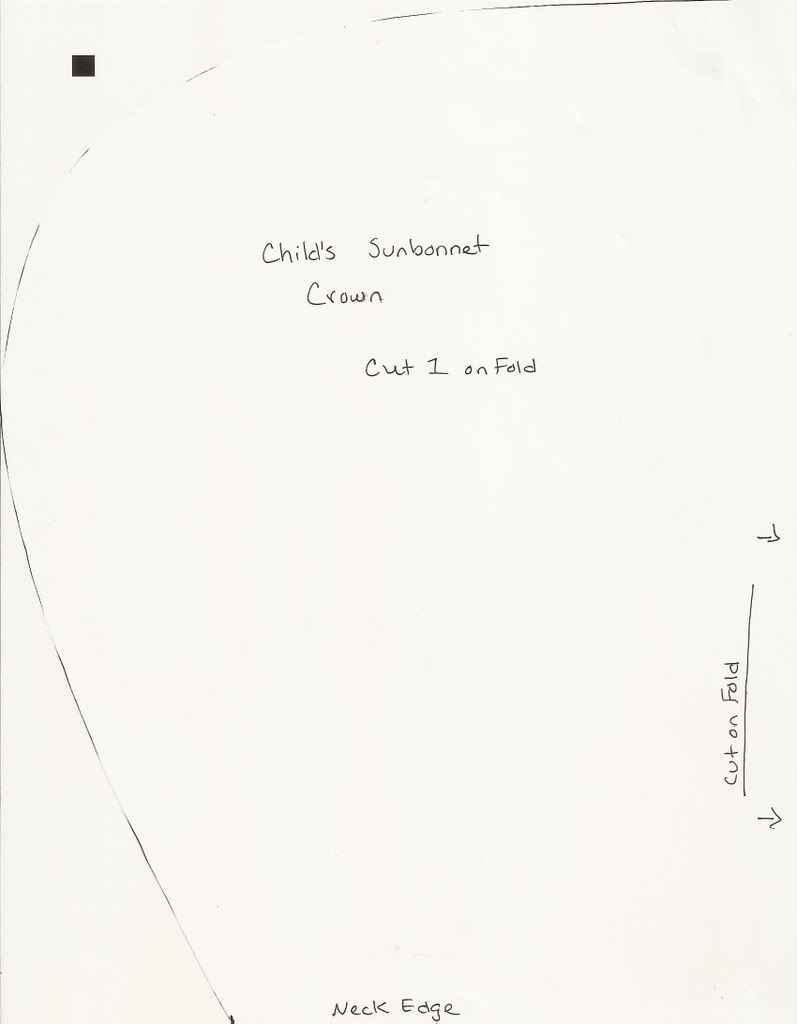
Toddler / Baby Mid-19th Century Sunbonnet

This sunbonnet pattern was inspired by this original bonnet at the Wisconsin Historical Society website. It features a wide brim that can be stiffened with quilting or cording, a full back crown and a curtain at the neck to provide sun protection for little ones.
I made my boys sunbonnets in cotton for coolness. You can use any light cotton. Beware of sheers though - although they are accurate and pretty to use, they do *not* provide good sun protection and it is very easy to get sunburned!

Variations: You could also use this same pattern to make a winter bonnet or hood for your little ones. Use wool or silk for the outer layer, wool batting for the inner layer (peeled thin) and a slippery fabric such as silk or cotton sateen for the inside layer.

Size: This was drawn to be roomy on an 18 month old child. I think it would easily fit a child up to 4 yrs. of age, or more, depending on head size. To increase this pattern to a larger size, please visit the link in my sidebar on how to alter pattern size.

You will need these pattern pieces:


Cut a rectangle about 4" wide x 12" long for your curtain piece

From your fabric, cut the following:

2 Brim Pieces

1 Crown Piece

1 Curtain Piece

You will measure and make the ties after the bonnet is assembled.

Assembly:

Making the Brim:

Lay your brim pieces on top of each other, right sides together. Pin along short edges and longest edge. Stitch, using a 1/2" seam allowance. Trim seam, clip corners and turn. Press well. If you will be quilting or stiffening your bonnet brim, now is when I would do that. It is easier to work with a flat brim than one that is attached to the rest of the bonnet. I originally made my boys bonnets with no stiffening at all but later added rows of machine stitches to stiffen the brim up.

*Note: On the original bonnet, it appears that the brim is made of one layer of fabric and hemmed at the exposed short and long edge, rather than being made of two layers of material. This would definitely be cooler, so feel free to make your brim this way if you would like!
Making the Curtain:

Press up a narrow hem on the short edges and one long edge of your curtain piece. Stitch hem in place. Run gathering stitches at the top of the curtain piece along the raw edge. Set aside.

Making the Crown:

Run gathering stitches along the rounded edge of the crown. Pull up to fit brim, pin in place and stitch with a 1/2" seam allowance. Bind off seam to finish, or overcast seam by hand.

Pull up curtain gathering stitches to fit the straight bottom edge of crown. Stitch, using a 1/2" seam allowance. Press seam up towards crown. You will bind this seam to finish, but before attaching the binding, stitch two eyelets in the center of the binding strip. Pin binding over seam. Before stitching, thread cotton cord or twill tape through eyelet holes to the seam between crown and brim. Pin cord or tape to seam, stitch to secure. Finish stitching binding. You will now have an adjustable drawstring at the neck to adjust for size as your child grows.

Ties:

Decide how wide you want your ties to be, and how long. Make sure they are long enough to tie in a generous bow at your childs neck. Cut two strips of fabric as long as your measurement and twice as wide as your width measurement, plus 1" for seam allowances.

Press strips in half lengthwise. Stitch around long edge and one short edge, using 1/2" seam allowance. Clip corners and turn. Press well. Turn in seam allowance at top of ties to inside of ties. Pin to bonnet and stitch securely into place by hand.

Enjoy!

1940's Toddler and Baby Rompers

These rompers were inspired by these original 1940's rompers from the Wisconsin Historical Society website.


For more photos of the finished rompers and the boys wearing them, please visit this link: My 1940's Boys

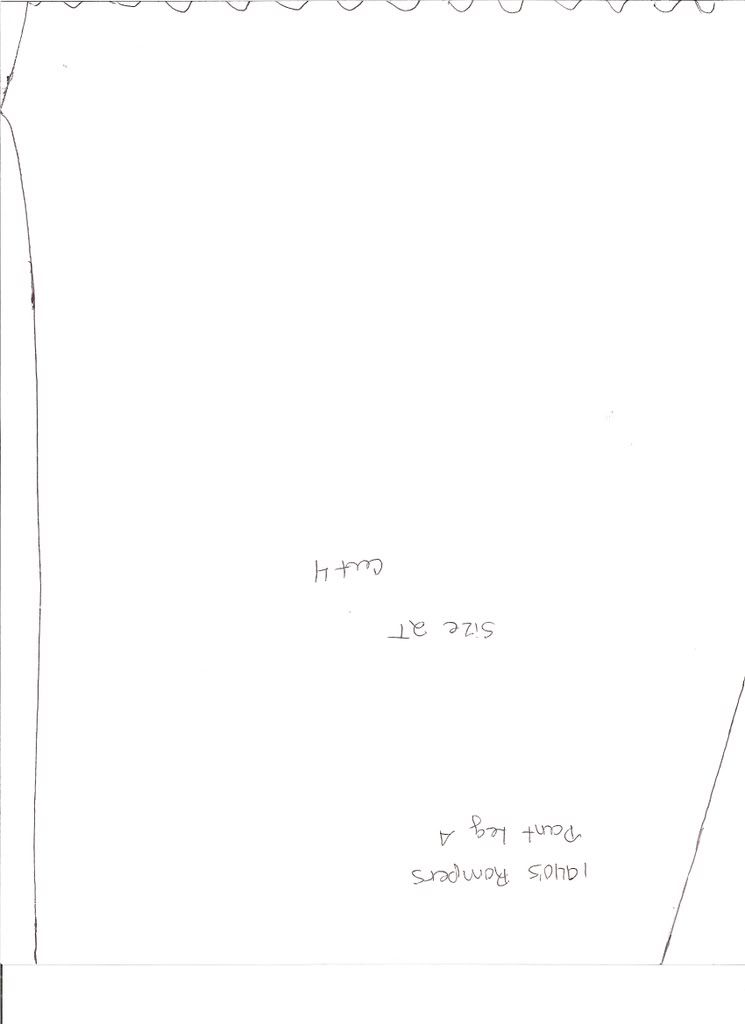
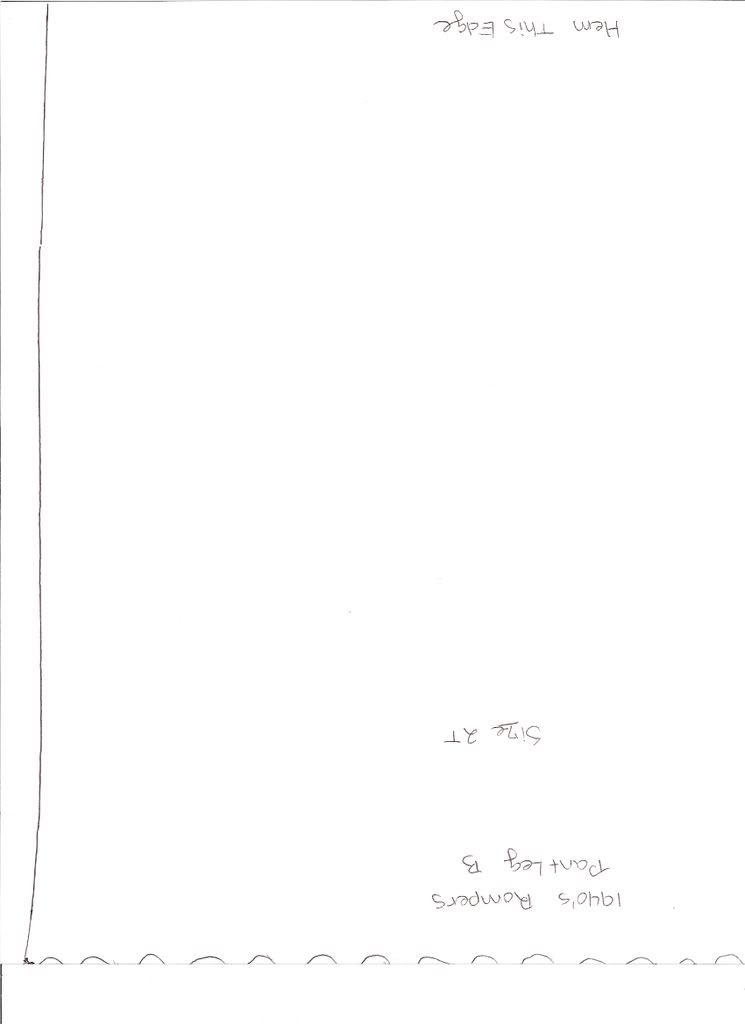
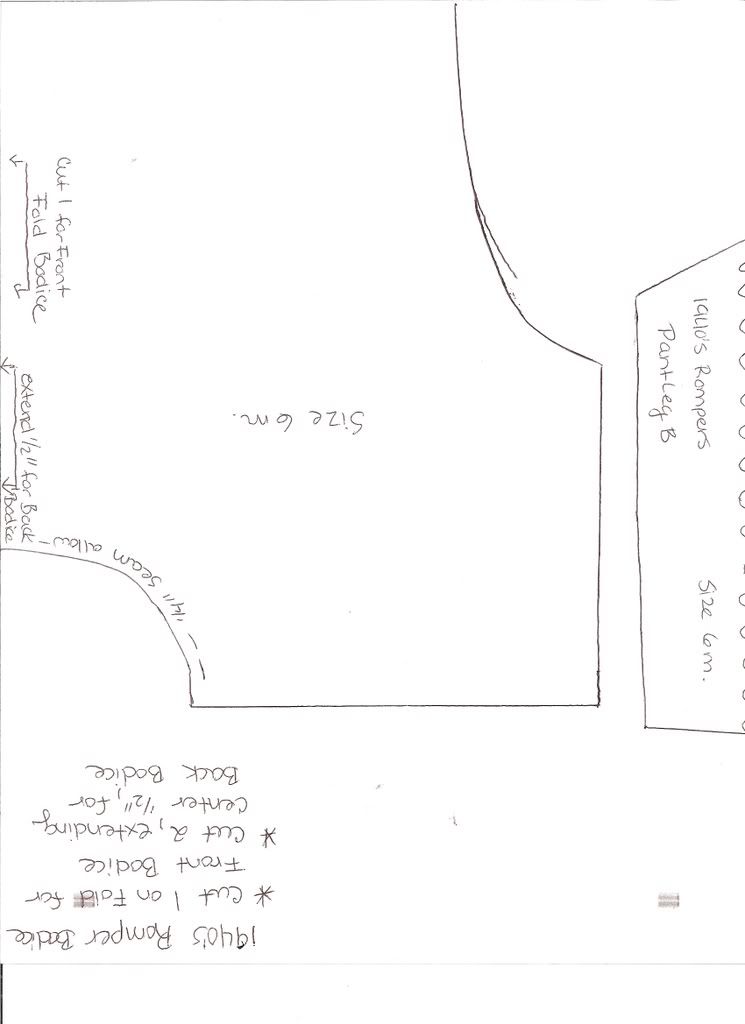
Here are the pattern pieces I drafted to use for my little sons, in sizes 2T and 6 months. Following are the scans of the pattern pieces and instructions for sewing them. If anything doesn't make sense, please let me know either through the comment section or direct email at david_sarahmeister @ mchsi.com (omit spaces). If you create your own garments from these please let me know how these work for you and share pictures, if you can! :)

Love,

Sarah

Romper Bodice, 2T

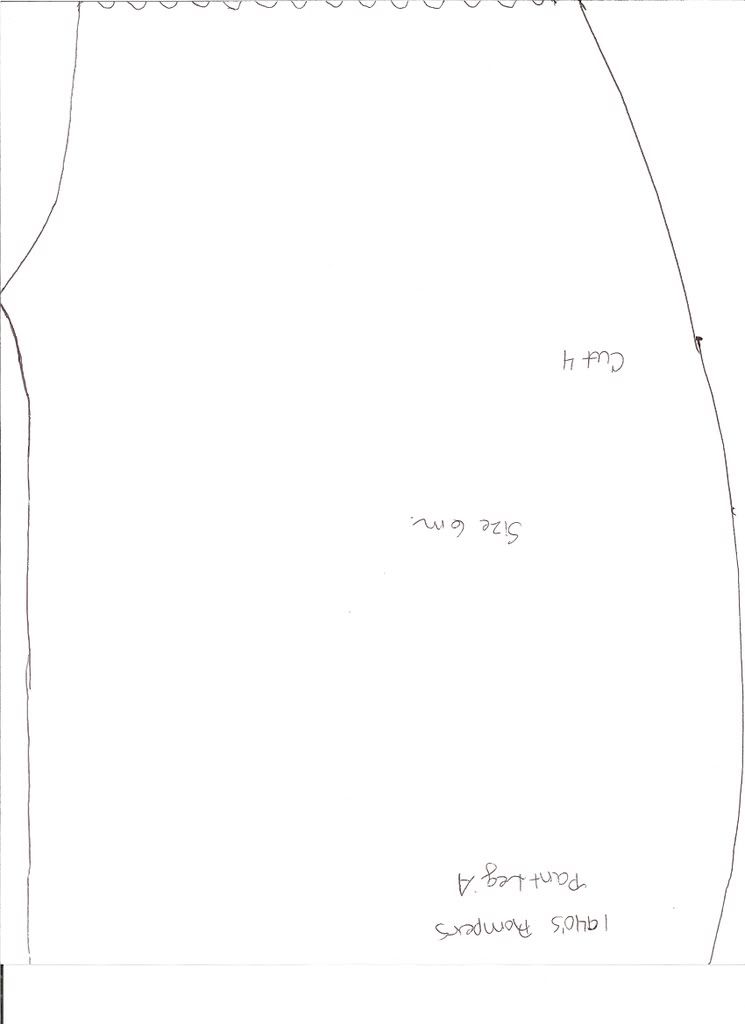
Romper Pant, 2T PIECE A

Romper Pant, 2T PIECE B

Romper Bodice, 6 months

Romper Pant, 6 months

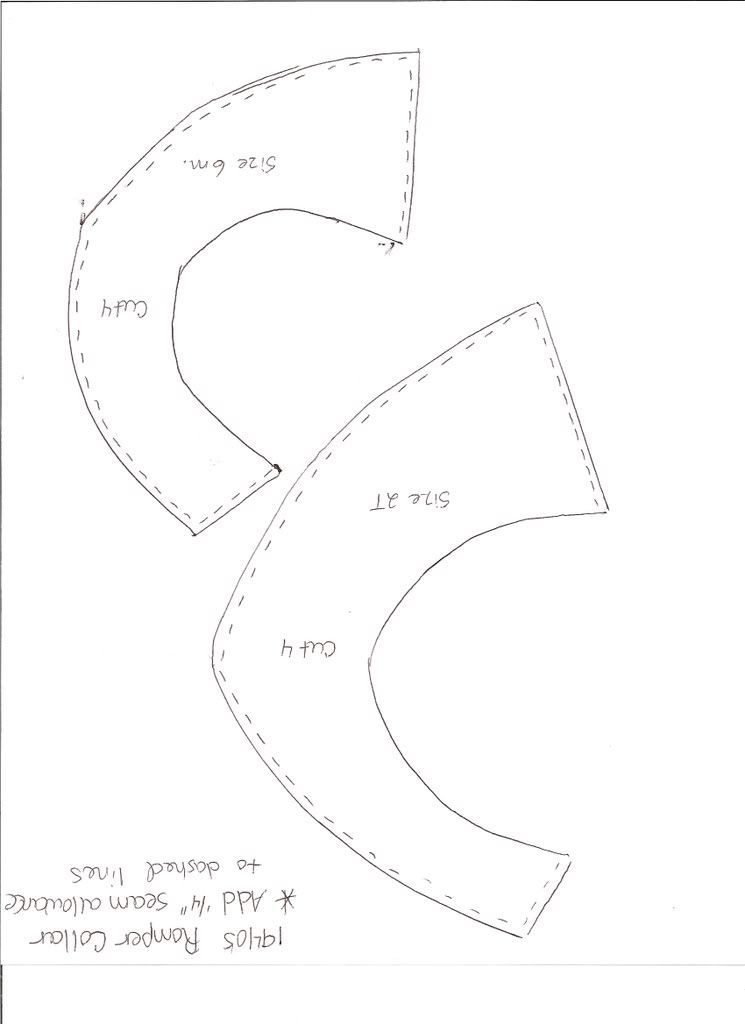
Collars


*The pant pieces, both sizes, are composed of two seperate pieces to enable them to fit on standard computer paper. Print out the size you want and tape the two pieces together along the wavy lines to get the correct pattern piece. *

1940’s Romper Assembly Instructions

Prewash and dry all fabric, even if you are recycling an older garment to make this outfit. If recycling, remove all buttons, zippers, trims, etc. and press the material well before cutting out your pieces.

From your fabric, cut out the following:
1 Bodice Front, cut on the fold
2 Bodice Backs, cut with the center line extended ½”
4 Pant Legs
4 Collar Pieces (from coordinating/contrasting fabric)

Reserve some fabric, or scrap fabric in a coordinating/contrasting color, for waistbands and sleeve bands. You will measure and cut these after the garment is assembled. You will also need some scrap fabric for a bias strip to finish off the neckline.

Notions: Thread, six buttons, hook and eye for neck. For 6 m. size, you will need snaps to sew into place for the crutch seam.

Collar:
Lay out your collar pieces, one of top of the other, right sides together. You will make two collar pieces that are mirror images of each other. Pin baste the collar pieces together and sew around short and curved edges, using a ¼” seam allowance. Trim seam, clip curves and turn right sides out. Press and set aside.

Bodice:
Sew Bodice Front and Bodice Back pieces together at the shoulder and side seams. Pin baste into place, and sew, using a ½” seam allowance. Finish seams for smooth interior. (on my rompers, I used French seams but that made puckers in the curved areas, so I had to clip there).
Sew center back seam of bodice, using ½” seam allowance. Stitch from bottom edge of bodice to 4” from top of bodice. Clip to seam at the top of the seam you just stitched. Finish seam below clipped area. Hem the seam allowance to the bodice above the clipped area to finish neckline opening.

Attaching the Collar:
Mark the center front of neckline on bodice. Pin collar to bodice, matching collar at center front. Baste. Cut a 1” wide bias strip the length of your neckline, plus ½”. Pin to neckline, right sides together, sandwiching collar between bodice and bias strip. Stitch, using a ¼” seam allowance. Trim seam, clip curves and press bias strip to inside of bodice. Turn under a ¼” hem on raw edge of bias strip and carefully stitch to bodice neckline, stretching around curved areas where necessary for a smooth fit.

Finishing Bodice:
Sew a hook and eye at back neck opening. If desired, trim bodice with decorative applique.

Finishing the Sleeves:
Measure the circumference of the sleeve opening. Cut two strips of fabric that measurement, plus 1” for seam allowances, 3” wide. Sew strips together along short edges, right sides together. Pin to sleeve opening, right sides together and stitch with a ½” seam allowance. Turn under ½” along free edge of strip and fold up to encase seam allowance, pinning along sewn seam. Slip stitch to secure.

Finishing Bodice:
Press raw edge of bodice hem up ¼” and again ½”. Stitch.

Making the Pants:
Sew each leg by stitching along the outer seam and inseam, right sides together. Finish seam so inside is smooth. Pin legs together along crutch seam, matching inseams. Finish seam. Turn right sides out and press well.
(*for baby pants, hem the legs and leave the crutch seam unsewn and finish by turning under a 1/4" hem to the inside on each pant leg. Lay a piece of bias tape or twill tape along the open crutch seam, covering the turned under hem. Stitch into place, stretching to fit smoothly around curves. Sew snaps to crutch seam to close. Finish the top of the pants by pleating or gathering to fit bodice edge and sew right sides together.)

Making the Waistband:
Measure the circumference of the pant waist. Cut a 3” wide strip of fabric this measurement, plus 1”. Sew together, right sides together, along short ends. Press seam open. Matching waistband seam with center back pant seam, pin waistband to pant waist, right sides together. Sew with a ½” seam allowance. Press under ½” on free edge of waistband strip and turn over to inside of pants, enclosing seam allowance. Slip stitch to seam line to secure.

Making the Hem:
Turn under raw edge of pant hem ¼”. Turn under again 1- 1 ½” (or more, or less, depending on how long you need the pants to be). Stitch into place.

Finishing the Rompers:
Mark 6 buttonholes on trouser waistband, evenly all around. Two in the front, two in the back, and two at each side. Stitch buttonholes. Sew corresponding buttons to hem of bodice. Button the bodice to the trousers.

Enjoy!