
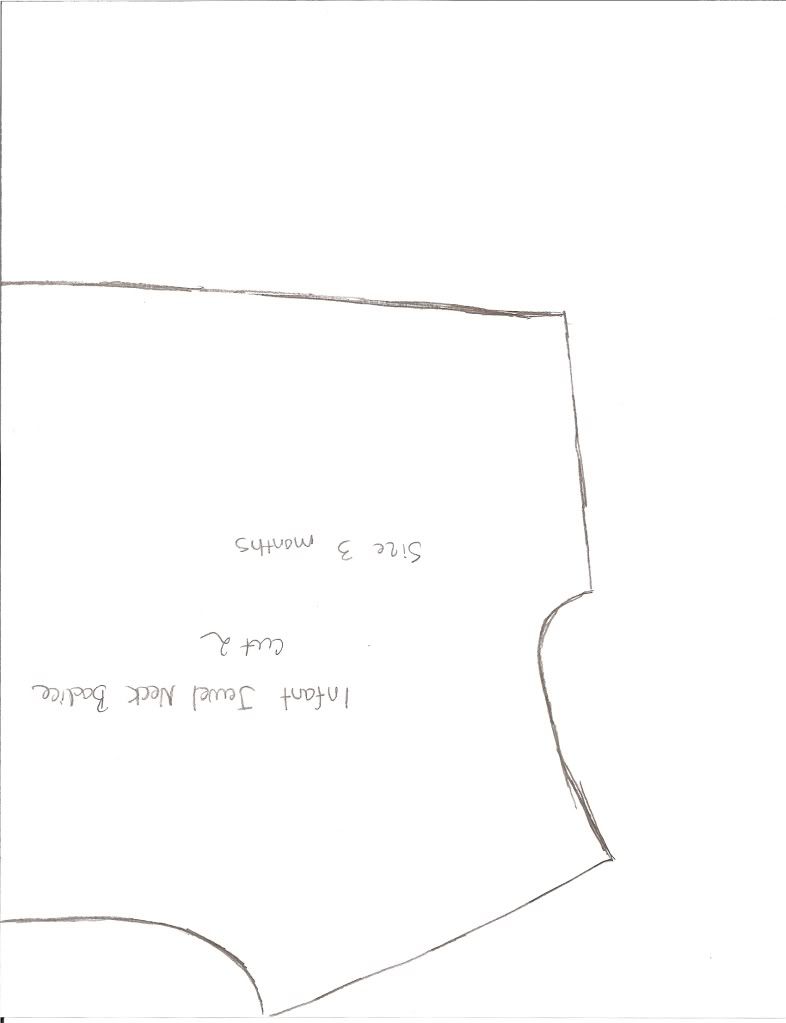
This is the pattern I created for the gown that Malachi wore to the 200th birthday celebration of Abraham Lincoln in February, 2009. This is a size 3 months or so. It can easily be made larger or smaller by following the directions in the tutorial, How to Resize a Pattern, found on my side link list.
 I give here only the pattern shapes for the bodice and sleeves. The skirt is made of rectangles which you measure and cut to fit your particular baby and style. The skirt can be nearly any length, but for an infant should at least cover the feet. For an older baby cut the skirt to ankle length or above and for toddlers, knee length to mid calf length is ideal. For Malachi's infant dress I made the skirts about 30" long and 60" wide.
For your gown, you will need the following pattern pieces:
You will also need the following pieces, which you will cut and measure to your needed length/width:
Sleeveband (for gathered sleeve): Measure around your baby's wrist and add 2.5" for seam allowances and enough ease to get the hand through. Make as wide as you like. I prefer a 1" wide finished width as that is an easy measurement to work with. So, for a 1" wide finished width make your sleeveband 3" wide.
Waistband: Cut as for sleeveband, except taking waist measurement instead. Make sure this is *not* a constricting measure and keep it fairly loose and comfortable for a happy baby. Take into consideration overlap measures and seam allowances.
Waistband Lining: Cut as for waistband. Can be cut of lining fabric rather than fashion fabric, if desired.
You will also need some bias strips for finishing the neckline and sleeves (if you make coat sleeves) as well as optional piping at the waistband and armscyes. Make sure this is cut of fashion fabric. Contrasting piping is very rarely seen on original childrens gowns from this period. It is better to use self fabric piping/bias strips unless you have a particular example with contrasting piping that you are copying. Use small cotton cord for your piping and a zipper foot on your machine for a snug, tidy look.
To assemble gown: *Note*: All seams given for a 1/2" seam allowance, unless otherwise noted.
Bodice:
Stitch bodice front to bodice backs at side and shoulder seams. Press towards back.
At back opening, turn under 1/4" on raw edge. Turn under again and press to create self facing. Stitch and press.
To finish neckline, either pipe neckline or finish with a bias facing. Press.
If piping armscyes, try the bodice on your child to make sure the arm is not too snug. Once proper fit is obtained, pipe armscyes.
Sleeves:
For a coat sleeve, sew outer arm seam, right sides together. Turn right side out and press. Hem the bottom edge or if desired finish with piping or a bias facing.
For a gathered sleeve, sew your sleevebands together, right sides together. Press seam open and turn right sides out. Run gathering stitches along the bottom of the sleeve and draw up to fit sleeve band. Pin to one side of sleeve band and stitch. Remove gathering stitches and press under 1/2" to the wrong side on the free edge of your sleeveband. Pin this to the seam, enclosing seam allowance. Stitch. Press.
Take up pleats or gathers at the top of the sleeve to fit the armscye opening. Pin sleeve into bodice, matching the shallow V-shaped area of the sleeve head (opposite the outer arm seam) to a position approximately equal to your childs breast line. The back seam should be in alignment with your childs back arm, over the elbow. Do *not* match the seam or shallow v to the bodice side seam as this creates an improper look and will be uncomfortable to wear.
Waistband:
If piping waistband, do so now. Do not pipe short edges.
Pin waistband to bodice, extending 1/2" on either side of bodice back opening. If needed, ease bodice into waistband with gathering stitches. Stitch waistband to bodice, right sides together. Press seam towards waistband.
Skirt:
Cut two rectangles the length and width desired. Sew together and press seams towards back. Cut a short placket into the skirt at center back and finish with a strip of fashion fabric. Hem the bottom of the gown as desired.
Run gathering stitches at the top of the skirt, or, if desired, pleat the fullness to fit the waistband, extending the waistband 1/2" on each side of skirt placket. Stitch skirt to waistband. Remove gathering stitches.
Finishing:
Press extended edges of waistband to inside of gown. On waistband lining, press under 1/2" all around. Pin waistband lining to waistband, enclosing all seam allowances. Stitch waistband lining to waistband around all edges.
Sew hook and eyes to back of gown to close it, or make small buttonholes and sew corresponding buttons to bodice back.
Enjoy!
4 comments:
Very pretty! :)
The gown is just gorgeous! I wish I could enlarge your pictures to see more detail. I always feel like sewing when I read your posts.
Hmm. . .I did not know the pictures are not clickable for larger views. Since posting this, I did start a Flickr account which I REALLY like because having them as a host gives me larger, more detailed pictures. Unfortunatley I am almost to my limit on Flickr unless I upgrade. I might have to do that!
I found your site via a posting on a forum after doing a google search for infant Civil War dresses. I LOVE this dress! Our little one will be attending her first event in a few weeks (she's just 5 weeks old right now) and I've been wondering what I would dress her in! Thank you for posting this. I was wondering if you might be willing to email the pattern to me @ ncflaggs@ctc.net
Post a Comment